Hi all,
Just thought I would ask a question before I rush into this issue and possibly break more stuff.
I just upgraded my CTC dual to Salfish 7.6 last night and it went through without a problem. The only issue I ran into was getting the timing between hitting upload and the reset button.
However, I didn’t follow the official documentation (I didn’t know it existed until today) and I didn’t make a note of the home setting thing. Now when I try to print I am getting the wipe line in the middle of the build plate and not the front edge and the prints are starting at the back right corner.
I have read that I need to reset the factory defaults by going to Utilities menu and then Restore Settings. I have attached a picture of where it currently prints. Is there anything else I need to do before I Restore Settings?
I am using Simplify3D and was using this to print with before I did the upgrade and it was working O.K then.
QUICK CORRECTION. I am running on Salfish 7.7 not 7.6
You may need to enter the X-Y offsets in S3D. I think it is the gcode tab where the platform size is. I think mine (qidi) uses half the bed dimensions as the offsets. If they are there then maybe removing them?
You need to restore your settings, and reenter your toolhead offsets, using replicator G, as described in the manual. I dont know what they are for your printer, but others, OR on the 3dprinters tips and tricks google forum folks would know!
Hi,
I have just done a test and tried printing the same file but sliced it in Makerbot. This is currently printing in the middle of the printer bed. The print quality isn’t great but nothing has been fine tuned in this software. So this means the issue is not with the values in the printer but the setting in the S3D software?
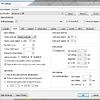
I have attached a picture of the settings in the G-code tab, If I remove the offset values then in the preview the build plate is moved off the print bed (see second picture)
Any suggestions?
Do you have the right printer selected in S3D. It should show replicator (1), CTC, or something similar. I think you have makerbot selected, and I am not sure that is correct…
Suggy
7
Also looks like your X & Y homing directions are set to max, I think these should be set to min!
Thanks for the update. Can you also let me know how I go about uploading the original EEPROM to the printer.
Here’s the EEPROM @ https://drive.google.com/open?id=0Bx5NsGVKghZwaTJaNGZxYjVzN0E. Just:
Select Utilities
Scroll Down and Select EEPROM
Press Up Key to Dismiss Warning
Select SD Card → EEPROM
Press Menu Key Three Times Per Instructions
All done - hope this helps!
1 Like
No, they should be max. Z home is min though.
Suggy
11
my X & Y endstops are plugged into the into the min endstops my my MB
Suggy
13
100% all on the min. I know because I have fitted 3 max endstops
Explain. The CTC, as supplied, like all makerbot clones, has one end stop per axis and they are xmax ymax and zmin.
So so why have you fitted extra endstops and why is your printer different to everyone else’s?
Thank you so much this has solved my issue. The prints are now back in the centre of the build plate. Now I need to tweak the settings for temp and speed etc to get the prints nice and crisp, just running the ctrlV_3D_test print from thingiverse. If you have any suggestions for setting in S3D for PLA it would be appreciated.
Suggy
16
Don’t know why its different. Fitted z max end stop 1st as it kept bottoming out. I fitted doors and print cooling fan and the fan kept hitting the support strip I put on the back of the slave door so I fitted y endstop and as for the x endstop I just fitted it because I had 1 spear
Hey Abernus - I run 6 CTC’s so I’ve run into just about every problem you can imagine. For this issue you just need to upload the original EEPROM on the CTC Machine via SD Card. This contains the homing positions for the machine’s firmware.
I’ll upload the default EEPROM for you and post a link to the file in an hour or so when I get to my office.
- Matt
Again thank you so much. I have already done the MOSFET and the glass bed, the others I will have to set about sorting out. The prints you produce are excellent. I hope to be producing some good prints soon.
No problem! Once you start using all the upgrades they run beautifully. All six of our CTCs rarely have any down time. Also, we just use Aqua Net Hairspray on the Glass Plates for adhesion… makes printing nice and clean. Spray a good amount on the glass and let it heat up for 5 minutes and it’s just as good as ABS Slurry but not toxic.
Suggy
20
AND DONT USE CHEAP FILIMENT