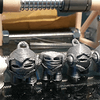
I have a collection, now, of Marvin’s trying to pass the test print for 3D hubs. I have had success, in the past, at printing delicate doll heads and gears with 0.2 mm resolution print tips. The white Marvin is my current 200 micron print and it is a mess. Either the layers are too far apart or too close together. I cannot decide.
The curved floating geometry is an issue for the resolution of the bottom half of the sphere. There is simply nothing for the extrusion to grab on to. Remarkably, floating linear bridging is consistently working, but when the path curves over a bridge or undercut, (where nothing is beneath it), then the (flap) tends to curl up and hug the nozzle, making the resolution exterior poor. My handles are printing very nicely. Having the fan on for bridging is, of course, very important, and if you do not have a shroud; that is supposed to really improve print quality.
Most of what I have read on correct printrbot settings use a extrusion multiplier of 1, however, I am only getting good print quality at 0.1-0.08. Even at 0.1, the stepper motor skips steps trying to feed the filament too fast into the extruder. I am also printing slower than most videos I have seen.
My biggest challenges at the moment are getting the right layer height and trying to find a way past the floating curve bridging problem.
4 Likes
What slicer are you using? Also, have you received reliable results from the filament that you are using in the past? I printed my marvin last night at 100microns with no major issues using Hatchbox PLA and Cura to slice. I did not try printing at 200micron, but I’d be happy to share my settings with you when I get home - I don’t know them all by heart atm.
Thank you for being open to sharing your printer settings with me. However, unless I switch to Hatchbox or Cura, I don’t think they will translate to my printer.
I am using Repetier and Slic3r. I didn’t realize there were other options for printer control beside one or two other programs.
I have had good results with this filament on the mechanical spider build featured on ‘thingiverse’. However, I think this filament is a little gooey; low melting point. (Solutech silver-color 1.75 mm)
I am curious on how you were able to get 100 micron print quality. I wasn’t aware of a 0.1 mm printer tip being sold for Printrbot.
Thanks for your comment.
I have some Hatchbox Silver that I initially thought was gooey, I was able to get some good results by lowering my temperature down to 190. However, since then I did some calibration and refinement of my settings and found that a temperature closer to 200 performed much better with the new settings.
One thing that really helped me was changing the steps per mm on the extruder. Cura was using the default values in the firmware, which if I recall was 96. After calibration I if I recall correctly I set my value to 71. The key of this setting is that it defines how much the motor should crank to get a mm of filament fed to the extruder. It doesn’t sound like a big deal, but if your extruder is pushing through 135mm of filament thinking it’s pushing 100mm, you’re going to have a bad print. Check out this video for instructions on calibrating your e-motor: https://www.youtube.com/watch?v=YUPfBJz3I6Y&list=PLDJMid0lOOYnRCAdbFfzECor3EbqF8euw&index=22
After that, I focused on tuning in my speeds. Those values I don’t remember offhand, but I did adjust the Jerk and acceleration values on the board, and then played with some print speeds. There’s some other videos on that same youtube channel that were very helpful to me. Tune your motor values, then play with some print speeds. I still have some more fine tuning to do myself, but I was able to develop some good profiles for Cura for printing at 100 and 200 micron, as well as a pretty speedy 300 micron profile that I used to print some test parts for some joints.
I hope this helps, all of this should be good information regardless of filament brand or slicer. Let me know how it turns out for you, I’m thinking about trying Repetier/Slic3r at some point as I understand that it has some additional fine tuning values that I think may be worthwhile. That and I’m not sure that Cura really picks the most efficient paths… some of the places it stops to go to the other side of the print before coming back to finish just strike me as very inefficient.
1 Like
I downloaded cura and think you get a lot more control with repetier. I did not give it a fair chance though. Im getting some good results with my 0.3 mm head. I adjusted the layer height to 2.4 mm and that seemed to do the trick. The undercuts and curved bridging is still an issue but not as noticeable as before.
k5o52
6
Cura is a bit more user friendly than Repetier. It provides a good belance between easy printing and configurability. Good to hear the PrintrBot produces acceptable results again.
Check the PrintrBot talk forum if you run into some issues in the future. It contains lots of expert users, information related to troubleshooting your PrintrBot and expert tips to finetune to print on 100 micron or less 
Ken
Type M501 into Repetier-Host and check what it returns for M92. Your steps/mm should be 80.00 for X and Y, 2020.00 for Z, and 96.00 for E on the Printrbot Simple Metal. This will ensure that your dimensions and extrusion rates are accurate, assuming you’ve entered an accurate filament diameter in your slicer (1.75 or close to it, if you measured your filament with calipers). Are you using the stock 0.4mm nozzle? It should work fine for anywhere between 25 micron to 320 micron layer heights.
One thing i cannot reccomend more is to callibrate your z probe and keep it tight. And callibrate it down to a hundreth of a mm. Also try using a raft. And for the extrustion multiplier i wouldnt change it but change the steps per mm val which is shown on thomas sanladerers youtube channel. Also my ubis hot end never skips you may have a clogged nozzle which i have had before thats the only time my printer has skipped steps. it also may be if you are printing too cold i print at 200 c for pla.
have an early 2013 printrbot simple. i use to print cubes to calibrate to the detail the axis, check the tension of the belts, and make a good control of the temperatures of the filament. I passed the test at fist try, and i think is because i tried many filaments before. I use PLA at 210ºC first layers and switch to 205 after. This model requires 100%fan al the time. my max speed is 60mm/s even 50mm/ ti aassure the printinh have enough time to get cold between layers. usinic3r, but the last version. The bad part of your side is motor skipping steps, i think. and the cooling
Good luck
Yeah, from what I understand Repetier has a lot more fine-tuning options. I’m planning on trying it at some point, but for now Cura is working for what I need it to do. I’m glad you got this working, your print is looking good.
Try running at a higher temperature at a lower speed of under 30. Tighten the extruder and try it again
sorry to hear it. I too am struggling with printrbot settings First layer printing problems - YouTube
Hey Patrick. It does look like your z offset may need to be adjusted a little lower, however I expect that the majority of your adhesion issues are due to your bed prep. What type of blue tape are you using, and how did you prepare it for printing? Painters tape is coated with a wax, which helps its primary function for masking paint edges. It makes a lousy surface for hot plastic to stick to, though. It’s important to remove this coating before trying to print. Some say that the brand of tape makes a difference - I can’t say for certain because I’ve only used Scotch 2090 since it was confirmed to be good. You also need to wipe down the tape with alcohol before printing to remove the wax and any other oils or contaminants. Most people use isopropyl alcohol, I use denatured alcohol from the hardware store just because I had that on hand but no isopropyl when I started printing.
Scotch 2090 tape is very easy to find, although it will cost a bit more than store brands. It’s the one with a white stripe on the packaging and says “general use” or “multi-use” (I can’t remember for certain.) It will say Scotch 2090 on inside roll, but I think it’s also listed on the outer wrapper as well. I use the widest roll I can find, it technically costs a little more per square inch but it’s a lot quicker and easier to lay down and I have less seams.
I hope this helps, if you still have trouble let me know.
Thanks, I had not heard about the wax and alcohol. I am using 2090 3m scotch tape and freeze hold hair spray.
Try without the hairspray as well. I’ve never used it with blue tape, it’s my understanding that it’s used with a bare metal bed. I’m not sure if it’s good at getting a better release when printing is complete, I often have trouble getting my prints off the bed without marring the tape and having to put down a replacement strip.
k5o52
16
My secret for the PrintrBot Simple Metal without heated bed was: kapton tape on the metal bed combined with woodglue (PVA + 50% water). A slight layer of that PVA mixed with water did the trick creating a nice first layer adhesion between the print and the kapton tape. It prevented almost all warping effects and also created a smooth bottom surface as if it was printed on glass.
Repetier may give you more dials, but it’s moot if you don’t know which way to turn them.
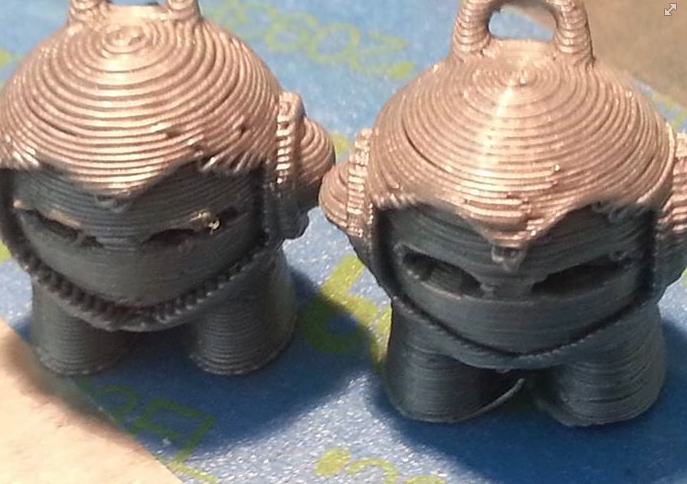
Marvin in 3D Solutech “Real Silver” sliced with Cura 15 and printed on the stock Printrbot Simple Metal heated bed model 1403 with thing:356001 and thing:607836 upgrades; printed at 0.09525 layer height (all layers), 187C, 15mmps, 4-shells, 30% infill, 40mmps travel, 0.98 extrusion multiplier (on calibrated extruder), 100% fan @ 0.2mm, PVA (Uhu) over PET on 0C bed in far-left corner with 25mm diam, 2-shells “cooling” cylinder printed in close-right corner:
https://www.3dhubs.com/san-francisco/hubs/fiveangle-same-day/
this is amazing; all the little support material is right where it is supposed to be.
wow, I wiped the bed with alcohol and it’s super sticky! Thanks who suggested that.
What filament did you use for the shiny marvins on the right? Do you have more pictures of stuff printed with that?