Hi All,
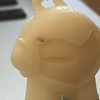
I have been struggling lately with my M200 trying to print a Marvin without a burn mark. The burn mark is noticeable in the top-left corner of Marvin’s face. I cleaned the platform thoroughly and auto-calibrated correctly. When I turned the Marvin to face the fan, the mark was still there.
I finally realized that Z-Suite was inserting this aberration! I can see it after I “Prepare to Print” the model.
I tried various print settings and the only option that doesn’t create the mark is choosing the Shell option, and with 3 Shells (no Bottom Shell).
Is there another slicer that I can use that creates .zcode (has a plugin), or perhaps a way to clean up the STL before uploading to Z-Suite?
Thanks,
Shannon
1 Like
3DMuse
2
I checked the file on Mesh Mixer and the STL is fine. It seems that this is how Zortrax’s slicer behaves, usually it’s not a big deal just in white you can see some scarring. I tried it on my machine with the following settings and also noticed some scarring but less than yours. I wipe my nozzle and keep them clean directly before and after every print.
Z-ABS; 140 Microns; Infill Low; Supports off;
I also took time-lapse shots on my GoPro and noticed at the burned area, the nozzle pulls up the strands and keeps touching it every time it passes causing the burn marks. For my machine, it’s quite minimal and can be shaved away using a knife.
Did you manage to calibrate the build plate using the auto-calibration? How are the rafts now?
James
1 Like
Hi Shannon,
These burnmarks are common problem in Zortrax. I didn’t realize they are caused by toolpath glitches!
Unfortunately I haven’t herd about any alternative slicing software for Zortrax.
Possible solutions for minimizing burnmarks:
1. Change material. Z-ABS is prone to this issue. Change to lower temperature and darker color material eg. black Z-Ultrat.
2. Zortrax original nozzle is rounded and cary A LOT of grime. Z-temp says their conical nozzles handles this better.
3. Try manually tinker this region of mesh in 3D software. Sometimes even minor changes have significant difference on the output code. A small fillet should help.
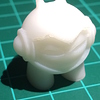
PS. Anyway I’ve printed 4x5 army of Marvins in white Z-HIPS and none of them has burnmark. Although right eyebrows are far from perfection.
1 Like
Hi Shannon,
I had the same problem on a regular basis. You can do a few things during a build that sometimes go overlooked.
Orientation of actual object (Marvin) you can try rotating 45, 90 or some random amount. This can sometimes take the mess away from the leading edge. (more in multiple prints)
Cleaning nozzle before and DURING.
When I say during you can use the pause function so that the nozzle can be cleaned and then let the print continue.
The final option is too ramp up your fans speed. change from auto to 100%.
It is a brilliant printer but does have some irritating limitations. But that is why it is a winner for 3D printer beginners.
I hope this helps.
Regards
Nick
1 Like
3DMuse
5
Hey @Aksjomat,
I think you got the solution! Resliced it with random seam and the hole shifted to random areas on the model. Should help with the burn marks. Thanks for your input, learned something new.
Regards,
James
1 Like
Hi
I’m wondering if this could be related to the seam that’s caused by the start of a layer. Try “random seam” in the advanced options.
Be sure to update Z-Suite to the recently released 1.7.0 version.
2 Likes
I’m glad I could help 
Actually I had the same issue and your post and images got me thinking. Now I need to try this for myself
Did the previous versions of Z-Suite show the seam after slicing? I’m under the impression this came with the new one.
1 Like