3DMuse
1
Hello Hubbers,
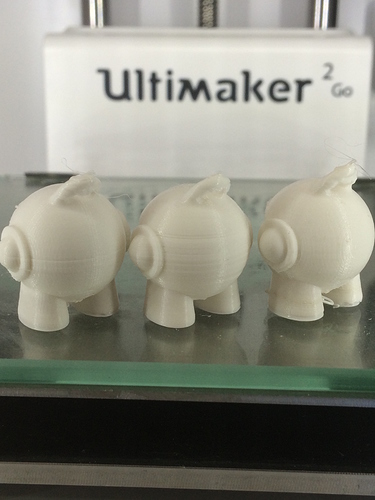
Just want to share something that helped me this morning. Referring to the picture of Marvins above, the first one was when I noticed the line right in the middle of the ear area. It was pretty consistent and appeared on other parts at the same height as well. That’s Marvin no. 1.
I got nervous and put some Magnalube on the Z-rods (not the screw but the two rods). Mistake no 1. It printed ok for a while but soon had more resistance than before. After doing some research and realising my mistake, a quick fix was to degrease the bearings but I decided to buy them new online for a few bucks. Part no is LMK12LUU (Btw: Anyone doing a bulk order for Misumi LHFSW12 bearings?)
I removed the Z-rods (hell of a work, should avoid at all cost) and removed the build plate, unscrewed the old linear bearings, partially screwing on the new ones (to tighten later, there is a standard procedure to follow if not it will get stuck), putting back the rods, screwing back the controller board etc etc. I followed the advice of many online gurus and did not lubricate my linear bearings at all. Somehow the wild Marvin no.2 appeared. I was bewildered. :YaoMingMeme:
Now this morning, trying to solve this problem again I examined the rods for the 100th time. I realised at the bottom, there were minimal dark oil rings… I assume the bearings from the factory must’ve been pre-oiled to prevent corrosion. I remember reading something about the oil causing some balls to slide and some to roll causing them to jam up. I took a few pieces of kitchen towel and began to wipe down my rods. Moved the build plate up and wiped the bottom of the rods, moved it down and did the top of the rods. Changing new paper kitchen towels after a few wipes. I did this and used up around 5 pieces of paper kitchen towels. I proceeded to print a Marvin and this is when Marvin no. 3 appeared. This problem requires such a counter intuitive approach so I can imagine a lot of people did the same mistake.
No doubt the bearings itself also needs some oil for lubrication but it seems to be very very sensitive to the amount applied. It needs to be minimal. As a disclaimer, I must mention that this “fix” does not apply to all Z-banding issues. You need to power off your machine and move your build plate up and down by hand (back of the build plate to minimize bending) and feel if there is some resistance going down. Going up is always fine, only going down it will jam up and you’d need extra force to overcome it. Sometimes it could also be the screw or nut. Either way, I hope this will save some of you some hours of fiddling.
Added suggestion from gr5org: Could also be dirt build up in the Z-screw and be cleaned using your fingernail and some kitchen towel. Reapply the supplied Magnalube afterwards. It is possible to remove the four screws of the nut and only glide the build plate up and down on the bearings to test them independantly.
Cheers.
3 Likes
XTRUDR
2
hmmm,
I have seen similar issues with my UM2+ and will check per your advice!
Anyhow very helpful!
brgds
Winfried
HI ALL
i just thought i would add my observations , alot of people confuse z banding problems , it may look like z banding but sometimes its not it can be over extrusion , it seems to be more relevant with "cheaper rolls " thats just my experience having sufferd what i thought was z band but it turned out to be over extrusion , lot of good points made in post about oiling bearings etc too much can be just as bad as not enough
3DMuse
4
Hello onestop3d,
That is a good point. Sometimes the wrong settings will also give you similar layering issues. I guess the confusion comes because Z-banding is also a form of over-extrusion due to the platform not moving down sufficiently when the micro-jam occurs.
I have to add, for this particular issue with the linear bearings, the error occurs almost always at the same height consistently regardless of filament, part size or part geometry. I say “almost always” because sometimes multiple lines appear in the same region instead of one. The layers above the banding region will still have the usual Ultimaker quality so you know it’s not a material quality issue.
Cheers.
3DMuse
5
Hello Winfried,
thank you for commenting. I am interested in knowing how this theory holds up. Scouting the forums you will see that this problem is not that rare so it will definitely be helping somebody.
i had exactly same problem as you mine happend exactly same height every print , what was a give away to me , which i was blind to was actually the filament , instead of me trying different roll i persevered with the same roll (foolish ) once i swopped the roll it then became apparent what the problem was as my issues dissapeard , hence i went down the extrusion path and within few mins the problem was solved , now to throw another another scenario into the mix the problem filament was white and observations i have noticed is that lots of people have problems with white filament and zbanding / over / under extrusion
3DMuse
7
As you said, in white such errors are more obvious whereas with other colors can hide such flaws better. That doesn’t mean the problem isn’t still there. If I look at it from a more scientific point of view, why would over-extrusion happen only at a certain height and not at other heights? The quality of the filament doesn’t have any direct relationship with the position of the print bed.
So I guess what is regarded as a “good filament” is one that prints well in a wide range of settings, have good flow characteristics and is not easily affected by manufacturing tolerances. In this case the consistency in which the build plate moves down is the manufacturing tolerance.
Hi @3DMuse,
I had the same problem a month ago. Right now, the issue is still appearing from time to time, quite randomly. I’ll try to apply your suggestion and I’ll let you know the result! Thanks for sharing your issue!
gr5org
9
Excellent post! Stainless steel shouldn’t need any oil to protect it from rusting and ball bearings shouldn’t need any lubricant either as they are rolling, right? Or did I miss something. I guess one ball can have friction to the next but so little that it’s better to use zero lubricant I think.
The Z screw can also cause banding. I recently spent only 5 minutes cleaning a Z screw by using my thumbnail to push a paper towel into the threads as I rotated the z screw with the other hand (always easier to go down). This made a big difference on the Z banding. The grease had gotten quite a bit of dirt in it and was almost black after a few years of use. I would have cleaned it more thoroughly but it was not my Ultimaker - it was at a Fablab and I had other goals that day.
1 Like
gr5org
10
The next thing to fix regarding Marvin: print 2 at the same time in “all at once” mode in Cura. It will make a huge difference to his hook on the top of his head as each will have time to cool down while printing the other Marvin. Of course you then need to get your stringing down to zero and white is particularly difficult with stringing.
1 Like
3DMuse
11
Hey,
Thanks! Maybe you are right and the oil was some residue and not an anti-corrosion measure. Either way it’s bad for the linear bearings. Good suggestion on cleaning the Z-screw as that could also be the case. For mine I unscrewed the nut and examined the linear bearings independently but I will add that to my maintenance routine!
3DMuse
12
Hey @federico3,
Sure please let us know how this theory holds out! I personally would like to upgrade to the Misumi bearings as I’ve heard they eliminate this particular problem quite well.
Here something interesting, since I know you’re also a Zortrax M200 fan. Comparing both systems you’ll see why the Zortrax performs so well when it comes to layer consistency. It has two linear bearings per rod (top and bottom), uses two guides on top and bottom of the screw and a ball screw system instead of a nut. The screws are also massive.
Cheers
1 Like