Red10
1
I was doing some poking around on my printer because I would like to add a fan on the print head for better print quality. However, I had disconnected the rear exhaust fan, and when I tried running the printer after reconnecting it, it wasn’t working. I checked the fan lead, and the motherboard, which were giving 8 volts, even though its supposed to be 12 volts. This was while the printer was doing its filament unloading. Even though it had some voltage, the fan didn’t work. I checked the fan on a separate power supply and it worked fine. The same happened to the fan on the print head. After having unplugged it and plugging it back in a few times, it wont work, and it only reads 8 volts coming out of the board. I know for a fact that it was putting out 12 volts before, because I had checked before the fan stopped working. I also tested this fan on a different power supply, and it worked just fine. Without this fan, I can’t print. I also tried updating the firmware, with no luck of getting the fans to work. Does anyone know why this would be happening? I’m not very good at understanding circuit boards, so any help is great. Printer is an XYZ Davinci Jr. 1.0
1 Like
It’s besthe for the future to just buy external fans. USB Connection to the wall with good cable management will make life less complicated
ChrisM
3
Bit late, but mine had a print-head fan failure that I resolved earlier today that likely shares the cause as your own fan issue. In my case, the transistor that controls the fan failed yielding a very similar effects as your own printer’s failure. Note that the prior comment is applicable to additional fan control as I expect that the printer is not designed with much overhead in regards to power thus any additional fan load would likely lead to component failure.
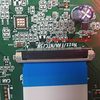
In my case, the failed transistor was a PMBT2222 marked with (if I remember correctly) W1P. The transistor is located above the ribbon cable on the lower right side of the main-board of the printer (accessible by removing cover on bottom of printer) with the printer oriented so that it’s lid is vertical with. I have attached an image of the transistor’s location to this.
To repair, simply remove the transistor and replace with a comparable one (could order an identical one). Personally, I replaced the transistor with a TIP120 Darlington pair on a daughter-board I made as it has higher current handling capacity and was what I had on hand. This replacement has not been fully verified for long term use though it worked with a small print.
I also imagine that you could get away with shorting the collector and emitter of the original transistor to lock the fan in the on state whenever the printer is on (may also be useful if the control pin failed as opposed to transistor).
I believe that the rear fan driver shares similar circuitry to the extruder fan circuit thus the fix would be similar. It is also advised that using an external controller would be better if you do not know how to solder SMD components.