Hey guys,

It seems to be a pretty straightforward one , but I can’t pinpoint what I should do exactly. The main question is - what should I play around with to determine the perfect settings for the printer to place the filament in the accurate location. E.g. The Nasa wrench requires quite a precise point for the whole thing not to be printed stuck together, but I can’t achieve that although the prints turn out really nicely (visually).

Note: I am using Esun filament PLA , which is half the price of Colorfabb so maybe the quality of it might be the issue here.

I’ve came across a problem which I am not sure how to solve. I’ve assembled the Turnigy Fabricator myself and printed the first Marvins and they look great. In fact, most of the prints turn out really well without much of a hassle, the problem comes when I start printing things with moving elements in them.

For example this bearing printed fully stuck to everything without anything moving (granted I scaled this one down to 50% of its original size)

leelel.png

Same happened with this beautiful elephant (turned out pretty well , but the legs were stuck)

Well, not exactly stuck. I managed to move them, but I am not sure if this is how it is supposed to work (??)

One thing I did was realize that my Cura was interpreting the filament diameter wrongly and fixing that helped a little bit. Along with reduced temperature I managed to print the big ball-bearing which actually moved, but it wasn’t perfect still.

The big bearing and the elephant are actually moving now, but still not as smooth as I’ve seen other prints do. (I know that this visual with the kick-ass soviet union art in the background really helps me tell the story)

So here it is! I want to start printing some e-nable hands or something else functional and want to make sure that I can solve this first.

Thanks for the help!

8 Likes

over extrusion or too high a temp would be my top culprits. i would reduce the temp by 5 degrees at a time and see what the lowest temp was that gave good results.

Reduce the extrusion multiplier / flow rate and print at 100% size (no down scaling).

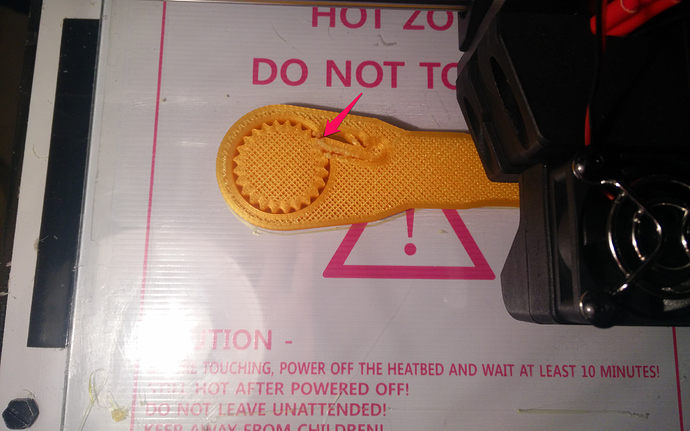
While printing the printer presses the filament of one layer onto the material of the layer below, if the flowrate is too high (100% might also be too high) the filament gets sqashed to the sides, meaning that the printed lines get wider. At one point the lines are too wide and will touch, even though there was a clearance of 0,2mm or alike set in the 3d file.

If you scale down the model you reduce the clearance aswell making the above described issue more likely.

Reducing the temperature might help a bit, but I’d go for more cooling, instead of less temperature. You still need the layers to stick to one another so you shouldn’t go too crazy with cooling and temperature dropping. Some cooling may help to get cleaner edges and it prevents “stringy” prints, in which the nozzle oozes material out during travel moves, those strings can cross the outlines of two seperate parts, causing them to fuse together => nomore movable!

Lastly I would go for another material.

PLA has a very rough surface and wears down quickly (ie in the bearings or in a gearbox). Nylon is by far the best -yet affordable- material out there to get moving parts printed, however it’s not that easy to print. ABS is fine too, but also there’s the problem of ease of printing. ABS tends to warp quite a lot and you might tinker quite a lot with it.

This is, why I would go for Polyester based materials (PET, XT, T-Glase, …). My personal preference is XT by Colorfabb, not only because of the price (3dhubs discount!!!), but also because it’s fairly easy to print, available in many colors and Colorfabb’s headquater is in the Netherlands. To my knowledge this is where 3dHubs (and you, Arnoldas) are setteled so there aren’t any trans-continental shipment costs added to the order.

As the last possibility you should look for models with larger clearance. In many cases the designers of those parts upload their models multiple times with clearances from 0,1-0,5mm or so.

Use a hammer (preferably with a rubber head, or covered with something, that’s not rock solid metal) and gently hit the 3d models, the vibrations and soft shocks can cause minor connections between moving parts to loosen, whereas those would stick together if you’d apply just your manpower :wink:

If you print stuff like planetary gearboxes the chances are, that the middle part has a hexagonal cutout (or something similar), this would allow you to take a large allen key and then you could try to crank up the gearbox.

Anyways good luck with the projects and let us know, if you experience some new issues or if you manage to get those parts printed.

Cheers,

Marius Breuer

1 Like

Thanks Marius. As always a real thorough explanation. For some reason I didn’t want to think of the simple solutions such as material flow and cooling, which you guys made obvious and thanks for the additional handy tips to deal with there. You’re awesome! How about that YouTube channel you were planning?

I was initially planning to make guidance videos of 10+ minutes length. However my first semester started just a few weeks ago and aside from studying I also do an apprenticeship (mechanical engineering ftw!). That’s why my free time is somewhat limited. Aside from that I had to move to another city and now have to build up a new workshop in the flat, once that’s done I’ll consider starting with small tips&tricks videos, featuring problems like yours. Luckily 3dhubs talk barely runs out of people, that have issues with their prints. Nothing promised, but I’m looking forward to do something like that. Beside all this I also signed up for the local majorship so there’s even more 3d printing related stuff coming.

1 Like