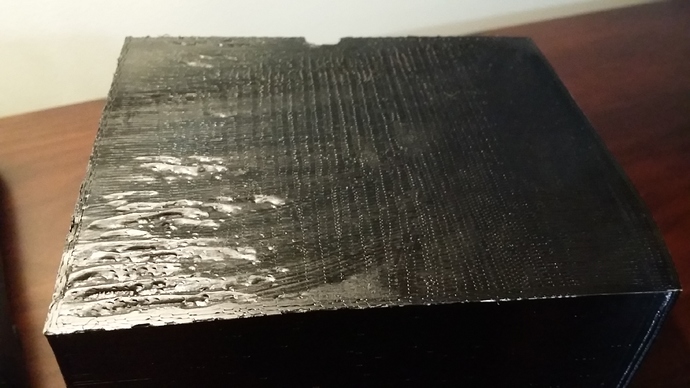
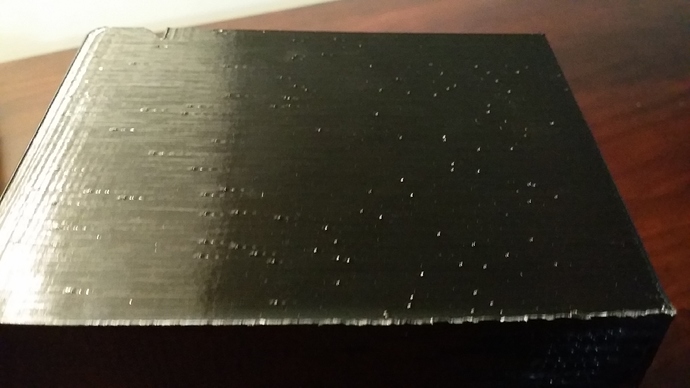
So I just got my printer back from robo3d and printed off a 12 hr print in hatchbox black pla. 200c nozzle and 70c bed. When I pulled it off the bed this is what I found.
Anyone know what I’m looking at? Also for large prints my parts get pimples. Little bumps that protrude along the exterior walls. At a loss for what’s causing that too. Uneven extrusion or travel maybe?
Thanks ahead of time guys.
Geoff
3 Likes
Looks like the first layer is too close to the bed, causing the extruded plastic to get smushed together so it doesn’t stick properly.
I’ve gotten those bumps before too. I think it’s just small pockets of moisture in the filament that pop when extruded, causing the little bump. You can try drying out the filament for a while before you use it next time.
There’s all different causes for these problems, but these are the two that are easy to check and seem to be the most common.
Hope this helps, post back if it works or not 
I would say try adjusting your temps a little bit and agree with goat that there may be moisture in the pla. You could try storing it in a big ziplock baggie with some dessicant packs salvaged from some electronic or other purchase, maybe even some dry rice. Pla and nylon absorb moisture pretty bad. Nylon is far worse at it, thats why they ship it vacuum sealed.
ghilt
4
Hmm I’ll try adjusting the bed. If it is a uniform problem, that is to say if my offset is too close, wouldn’t I see this throughout the whole bottom layer instead of 1 corner?
As for drying. Any suggestions. This sounds like a job for the kitchen oven set at relatively low temp. I just googled and it said 85c for 2-3 hrs. Ill try that
MB3D
5
Set bed temp at 60C and check that your printbed is absolutely flat and leveled, for any additional advices I’d need more information, but most likely it’s just the bed tilting to the “ugly” corner.
1 Like
ghilt
6
Adjust temps up or down?
Right now my SOP for storing spools is keep them in the box they came in, in the bag they came in, with the desiccant pack they came with, and I put a sandwich bag clip on the end to keep it airtight. I should note that I live in southern georgia so if anyone is going to have a moisture problem its going to be me. Ill see if I cant do something more clever. Thanks.
The smallest difference in height could cause this to happen, even smaller that the accuracy of the bed leveling. It’s too close to the bed on the whole print, but that one corner of the bed is slightly higher for some reason so it makes it worse.
Yeah, i keep a dehumidifier in the room with the printer and now i don’t really get this problem. PLA is great but that is one of the main disadvantages.
Are those pimples on the side of the print if so they could be the start point for that layer, it usually extrudes a little extra to get the layer going. You might want to check to see if your settings has the seam position as random, if so, you might want to change it to aligned.
You know what they are all along the side and totally absent on top/bottom. Ill check my settings when I get home. If so though wouldn’t I still have a problem if I changed it to aligned. It would just switch them to a neat little row?
Yes it would just switch them to a neat little row. You can also check to see if the “extra length on restart” setting has anything in it. You might be able to lower that setting to make the bumps less noticeable. Aligned will try to start the layer on a corner so its less noticeable, depending on the object being printed.
n23d
11
Yes the print head is too far away from the bed and/or bed is not level. I run a quick bed calibration print and check it with a micrometer after any event that could affect the bed/head height calibration. Here is a pix of the Gcode in rephost. Tried to upload the gcode but it is not an allowed file type. The G code was produced from a DXF line path and a translator program I wrote to convert the DXF into Gcode. If anyone wants a copy of the G code send me a message.
Miro
12
Your bed is not level and nozzle is to close.
Spot where the surface is worst is where your bed is closest. Just level platform and adjust height.
Ok. Mystery solved:
1. I run my extruder a little hot which makes it drool.
2. My printer has an auto-calibration sequence before it starts printing.
3. I have been printing in black a lot lately and I have a black printer bed
So nearest I can tell every time I ran the calibration sequence the drool deposited a little bit of plastic in one corner. A mound built up over time but I didn’t see it cause it was camouflaged with the black on black and was still very small relative to the eye. It was, however, enough to make my calibration sequence think one corner was significantly higher than the others and adjusted for that. I cleaned the bed plate off thoroughly and the problem went away.
TL:DR - Maintain your equipment or you will pay. Thanks for all the help guys.
1 Like
I was printing PLA with a heated bed for the longest time. One day I turned it off completely and my prints were glass smooth. I never realized that pla doesn’t need a heated bed. The parts printed at 205 came off the raft like I was peeling a sticker off a piece of wax paper with precut holes, smooth as silk. I recommend that you print on a raft and put down Elmer’s Craft Bond glue stick. It is WAAAY better than regular glue stick, but it requires a good scraper to get it off once it dries too thick… However, it appears to be soluble in windex, which is what I use after every few prints. That way, you don’t have oozing, bleeding, pitting, burring, stringing, spot burns. All of that went away when I turned off the heated bed. It is just too much heat coming up from below and the parts never truly set. Hope this helps.
ok fisrt off drop your bed temp to 40c and buy some cheap aqua net hairspray to use as a glue for your prints! spray it on the bed before heating fpr a print and it will drastically help your prints stick without having to use a higher temp! as far as the pimples thats moisture in the pla, ive had serious issues with hatchbox filament and since then switched to eSun filament i found on Amazon and had zero problems, but i also print at 212c hot end temp and found that really helped out alot!! also make sure your z offset is set at least .65 mm! i know this seems high, trust me give it a shot and adjust from there… Robo now says the z offset should be set at 1.0 but try .65 and see how that goes!! good luck
Hey Bryan. Thanks for the info but this is a dead thread. The root cause of the issues is listed above. Since you brought it up though I’m always nervous about aerosols going where they shouldn’t (ie on the electronics) and mucking up the works. I use painters tape and/or elmers glue when I need the extra adhesion and that seems to do the trick. My Z offset right now is 1.25 (from memory) and I know everyone will say that seems high but thats what works. I think the root cause of it is an uneven bed which I will soon fix with some sitall glass. Just waiting for a good excuse to drop the $50+ on the new glass.
yeah the aerosols dont get near the electronics so unless your closing your eyes and spraying recklessly it will be fine, especially since its one of the more popular ways to improve adhesion, but to each his own! good luck on the print… i was just trying to offer some help!