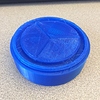
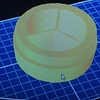
2 things… The stringing? and the bigger concern, why isn’t it printing the part as shown on the screen? This part was created in Inventor 2016 using the plugin CoolOrange to do the threads. Exported as an STL to ReplicatorG 0400. Scaled by 10. Then generated gCode using Skeinforge 50. See pictures…
5 Likes
I can’t really tell from the picture, but it looks like the part was originally designed to have 3 “fins” instead of a flat surface and 3 grooves? In that case, my best guess is that it’s an object manifold issue, and your slicer’s attempt to fix it resulted in a reversal of the solid fins and empty space.
Hey @LToyCreations,
the stringing I would say is actually quite minor. You could easily remove that with an exacto knife (aka. scalpel). If you really want it gone, try decreasing the extrusion temperature slightly, 5°C for starters and/or increase the retraction distance slightly (fractions of a mm to start with).
For the CAD-product difference I would suspect either an export error or a problem in the slicer. I don’t know any specifics about the software you are using, but I had similar issues when there were auxiliary construction planes present when working with Solidworks. If you are using similar things, try hiding them, then export the file to stl again. Alternatively, try using the automatic repair in netfabb to fix this. There should be numerous tutorials on this on the interwebs 
If that doesn’t work, try a different slicer. Cura is an open source option that I like to use.
Hope this helps,
Jonas
MB3D
4
To reduce the stringing you should play around with all the retraction settings and maybe also the flowrate (slightly reduce that).
The issue that’s appearing in the print is most likely due to a calculation error in the slicer, where it sees a layer (this time just talking about a plane, even surface that’s parallel to the XY plane) as completely closed.
Try to change the layer height just a tiny bit (usually reducing the layer height by 0,01mm does the trick), but maybe a greater layer change is needed in your case. Also you can play around with the model a bit (maybe rotate or displace it).
Cheers,
Marius Breuer
PS: I had the later issue sometimes with Simplify3D at layerheights of 0,125mm or 0,11mm when changing from 0,125 to 0,11 or from 0,11 to 0,1mm everything was fine again.
Thanks for the reply. I’m using inventor 2016.
Thanks for the reply. It’s not a few mm of solid printing, it’s from the bottom of the threads up. It prints the threads ok but then prints a negitive of the model.
Address the model error before worrying about that stringing. I’ve had stringing like that caused by model errors where it attempts to print onto nothing and therefore drags that filimanent across to be sealed over top by subsequent printing.
I just designed a 50mmx50mmx50mm cube, cut a hole, and used coolorange thread tool. Exported as STL and had the same issue with the print filling the hole. I am going to try not using the thread tool and see if it does the same thing with just a hole.
From Inventor, you exported (save as) an STL file, you can read it back into Inventor to see what the model actually looks like. There is an plugin for inventor to edit STL files, but it is easier to edit the Inventor model if there is a problem. Try subtracting 1mm from the top (open) surface and export the STL again to make sure the top is really there.
Thanks for the reply. Today I created a 20mm x 20mm x 10mm cube with a 10mm hole in the middle that goes al the way through. Printed it with out any problem. Added threads using the thread toll in inventor. Then in order to model the 3D threads I used coolorange plugin on the same model. Reprinted and the threads were printed and the hole was filled when it shouldn’t have been. The stl does not show the unexplained fill in any program that I view it in. I really think this is a slicing issue in replicatorG (skein forge 50). I am going to slice and print in mattercontrol and print on a robo3d tomorrow morning. If the same file prints correctly then it is a slicing setting or a problem with replicator g.
Sliced in Mattercontrol & printed on a ROBO3D with out any problems… So this is an issue in ReplicatorG.
James_2
12
Have a go with threads on a larger scale - when I tried to print threads that were toos small they just fell apart like that - then went to a 30mm thread and they printed fine.
However, I am using the ‘threadmodeller’ plugin for Inventor 2016 not the one you mention.
Threads are really hard to print - and when you print the male then the female should be printed with a bit of an offset (scale) as the threads are designed for precision and printing has a hard time … so go big first and creep up on the size you eventually want.
DB_MCTC
13
We are having the exact same issue. We actually printed a couple parts using the exact same method, but the latest part fills the hole. Even in the .stl file preview the part is unfilled. Did you ever figure it out?