vasil
1
Hello
Have a problem with smart extruder (type 12.2.1) on his printer. Model of printer is MB 5th Generation 3D printer, and the printer is new.
When he like attaching an extruder, the printer make an error about extruder attachment.
Only when put a plastic tail around an extruder, printer recognized it.
I tried with different type of extruder, but the problem is the same.
I check connector pins, but they are OK
Firmware is up to date.
* The air plenum on bottom of extruder is missing (see attachment). Is this a possible reason about the problem?
Regards
Need to know the exact error mate
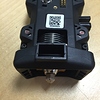
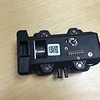
I have attached some photos of my Smart Extruder Plus off my MakerBot Replicator 5th Gen 3D printer which not had any issues with, with the new Plus Extruder! Before I fitted the extruder I updated the Desktop software and firmware on printer to lates and then fitted new Extruder and check in setting that if swap over from the std smart extruder to the plus smart extruder within setting as there will be different parameters hence updating the firmware and desktop.
Hope this help you move forward start to get some great models out of your 5th Gen MakerBot 3D Printer
Les
Planet 3D World
www.planet3d.world
twitter.com/planet3dworld
make sure some type of metal shavings haven’t gotten stuck to the magnets - putting a space between the extruder and the electrical connection. Check both the extruder and the X carriage.
Every once and a while I find that if you lay the extruder flat against the carriage mount and the motor tries to link with the extruder, it won’t let the extruder fully seat. Try angling the bottom away from the carriage mount a little and run the attachment routine on the control and see if that resolves the issue and snaps everything in place.
it’s a long shot but maybe the screws that hold the pins in the carriage are loose, causing the pins to side into the carriage housing? (the pins on the carriage) are mounted on a small circuit board.
If all else fails, print an extruder clip from thingiverse MakerBot Replicator 5th Gen & Mini Smart Extruder Clip by Fargo3DPrinting - Thingiverse so that the extruder is held tightly on the carriage mount.
The air plenum helps to regulate the hot end temperature as well as cool the prints. Without it on the old extruder I’d sometimes get a heat related error. On the new Smart Extruder+ You will almost always get a heat related error. The first SE+ I got had the plenum unattached from the extruder and I didn’t notice until I was getting errors (it was in the box, I just didn’t notice it). I’ve noticed that new SE+'s come with red tape holding the plenum on, so I must not have been the only one experiencing this issue.
1 Like
While your investigating this issue, take a moment to make sure the hex screw that secures the drive gear - on the “squid,” the part that the extruder mounts to, is tight. You’ll need a tiny hex-wrench, something like 1.5 or 2mm If it’s not secure on the detent (the flat part of the shaft,) it won’t turn the extruder gear and will create an error as well.
I have experienced the same problem with the extruder not fully seating upon mounting. When this happens, I press on the extruder while it is mounting and then once it is mounted I wrap a piece of duct tape around it to hold it onto the carriage. It’s a big Red-Green for my liking but seems to be working.