Use a raft, I had a similar problem but it was solved with the addition of a raft to the print.
I tried 210 and 200 and it didn’t help. Tried different heights for z axis and I was able to print little things.The blue tape failed completely when I tried it. Or do you mean double sided tape?
Thanks! Printrbot Play has a sensor, but what’s the aluminium paper for? The sensor won’t be able to see the transparent surface?
If so I’d have to cover the sanded surface with aluminium paper, but I don’t think it’s adhesive.
KFix
8
Nope, I meant Blue Tape (brand 3M) : http://www.abemus.fr/scotch%202090%20adhesif%20peinture%20bleu.jpg
When you say ‘failed’, you mean that your print doesn’t stick to it ? That’s odd, we’re talking about PLA right ?
If the blue tape doesn’t stick properly to the bed, and is pulled of by the wrapping print, that’s another story…
If your print is large, you might want to print it a little bit faster, to minimize the cooling.
I didn’t ask but, of course for flat prints with no heated bed, you should absolutly not use the fan for at least the 20 firsts layers (in 0.2mm, 40 for 0.1mm)
Yes, it sticks to the build plate. But the model I was printing didn’t stick at all. Double sided tape was more effective than the blue tape. What is so special about it’s surface that it is used for 3d printing?
No, because the sensor is electromagnetic, so it only sees metals like alum, copper, iron, etc.
If you look at the pictures, I’ve placed my aluminum papers only on the places where the sensors check in the beginning of the print and the area that it uses to Home x,y and z. The rest of the area is just the sanded acrylic. In some prints where the you’ll use the whole area, you will have a little going over the aluminum, but you could remove it before it start printing (I know it is not easy)
You can use a little of contact glue for the aluminum paper. Don’t use crazy glue or the like because it will be very hard to remove later…
I’ll take a better picture and a video of my printer when I’ll get to the shop later.
If you use the acrylic bed, you will need to put a little bit of lip balm on it to make it easy for you to remove the part when it’s done.
ehud42
15
Interesting - so you get no curl/lift from your prints with this approach?
How easy is it to remove the print?
I’ve been using a green masking tape, and find that while it holds the prints down reasonably well, it is almost impossible to remove the prints - often taking tape with them that is embedded into the print.
The curl depends on how much you can bend the base. The thicker the acrylic, less warping. Same with glass on the heated bed printers. I use 2.8 mm glass
The prints really stick to the surface so once in a while I use a little bit of lip balm or bee wax on the bed to make it easy (very) remove. But when you do make sure you sand it too. To compensate…
1 Like
ehud42
18
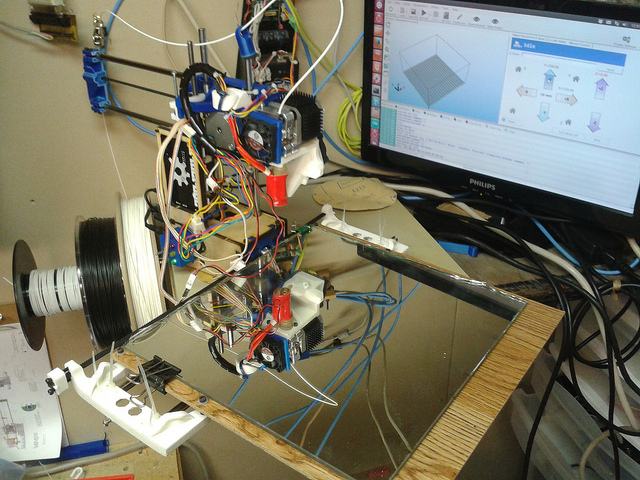
Nice! Will have to experiment with that. Currently I’m throwing around a (very heavy) glass mirror and it’s causing ringing/harmonics to show up in the print job. Am looking for lighter alternatives (I’m also printing a better design that doesn’t torque the bed so much).
COOL!
I want those custom parts you have! Did you design them? How big can you print?
You definitely need to try the acrylic sheet, a lot lighter on your printer. Will help you get even better prints…
ehud42
20
Ha - no I’m not nearly that smart. They’re designed by Jon Lawrence - he’s got designs loaded to Thingiverse (Thingiverse - Digital Designs for Physical Objects) and YouMagine (YouMagine – Designs by iamjonlawrence on YouMagine)
I currently can print 200x220x90 (lost some height in the conversion). I’m printing his designs from YouMagine and in between building a Printrbot #Frankenbot, hope to transfer the Simple guts to the new design from YouMagine (which will give the bed rods/bearings a wider stance and put the stepper between them - that should dramatically reduce the amount of twisting the bed does).
Tell them to drop the metal sensor and use an Plexiglas 9mm thick with proximity sensor instead. Do this real quick, get a 1/16 sheet of acrylic and sand it, I’ve notice you clip the mirror to a wooden base, ok then clip a thin sheet of 80 grit sanded acrylic and print something small so there is not so much bending, then you can pop the print out by un clipping the acrylic and bending it in different ways. You’ll be amaze… The other thing that would help is doing writing code so you can adjust the Z digitally instead of manually like in the replicator.
ehud42
22
Colour me impressed! I did a quick test with a scrap of acrylic, and after a false start (Z was too high) it worked quite well.
At no point during the print did the job appear to let go of the acrylic. Removing it was quite easy as well - it just popped off with gentle prying.
The bottom did lift a little somewhere in the process - placing the object back down on a flat surface, it was 0.5mm up on the edges. (The object is about 50mm long).


