cool thanks for the tips, I think you should do that wiki page :slight_smile: I actually have an old pump laying around from one of those old tubes you know you used to put the water in a glass vertical tube and plastic fish and it blew air in to make the plastic fish rise and sink… I might look at putting it to good use using the mods you suggest. :slight_smile:

well here is the orange PLA (faberdashery) the first one didn’t print too well using standard UP temperatures, I changed the print temp to 230, the under extruding problem seems to have gone now but its just not quite as sharp on the bottom of Marvs helpmeet, its the only place I notice it really, grey and white are ABS ,PLA orange in the middle, welcome any thoughts on sharpening up the edge of the helmet in the PLA

You should eb able to go lower on that temp - 230C is more an ABS temp. Faberdashery stuff is usually a better grade of PLA so it would be on the higher end, like 210C. Just listen for a jam towards the first few minutes so you can catch it early if it’s too low and save yourself having to clean out PLA dust form the jam.

Other than that, front and top open of course and a fan direct on the print (wind barrier fan is not enough). If you can’t direct it well on to the print insulate/screen your hotend and nozzle as best you can. Forcing the hotend to work harder can result in more heat working up in to the top of the extruder.

If I may offer my experience with acetone vapor smoothing for ABS.

I find that using only vapor, the detail of the print is damaged too much by the time the required smooth finish is achieved. To overcome this, I do my treatment as a 2 part process :

I use step 1 to strengthen the part ( using the acetone to better join the layers ), and then step 2 to make it look good and glossy.

Note : I do not sand any part until after step 1. I think that if you sand the part, you are clogging the small gaps between layers with dust and limiting how well the acetone can work.

so step 1 : to strengthen the part, I either dip the entire part in acetone, or if it is larger I use a 1cm wide paintbrush and paint on the acetone. After each I shake / blow off the excess acetone.

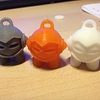
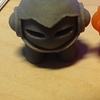
After step 1, the part will have a white / light patchy stain over most parts, and you’ll think you have ruined your print - do not worry - you have not.

Leave it for 1 hour for the acetone to evaporate and the ABS to harden. You can then do any sanding that you want.

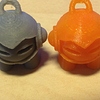
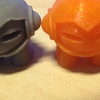
Step 2 is to give the part the gloss shine - do a hot acetone vapor treatment and you’ll see the discoloration disappear within a few seconds. Vapor treatment only takes about 5 to 10 seconds.

My hot acetone vapor treatment takes me about 4 minutes in total from start to glossy print.

I use an old cheap tin cooking pot, about 2-3 liter capacity. A large deep metal coffee tin would work just as well.

I rinse the pot with a little water, pour out the water, and then heat the pot on an outdoors gas cooker ( bbq ).

Heat until the last of the water has boiled away. This means that the pot is now hot.

Use a small jar to measure about 30ml acetone - keep it covered and away from the gas flame.

Turn off the gas - this is an important step !!

Now pour the acetone in to the pot and put on the lid.

Wait about 20 - 30 seconds for the acetone to vaporize.

Slide off the lid and insert your print ( hanging from a wire or cotton thread ).

You can watch the color return and the gloss appear in a few seconds.

Remove the part and hang to dry for 15 minutes.

Done.

1 Like

Thanks. I am going to give this a try. I never thought to use acetone to strengthen the layer bond. New tool for the 3D printing tool box.

Thanks for the feedback. I watched a few YouTube clips to learn the process. I have never dipped or had any physical contact with the acetone with my ventures. I use an old electric hotplate (camping one) and an old coffee peculator glass pot. I heat the glass pot gently and then add some acetone (not much at all), I only heat it enough to see the vapours running down the outside of the pot (not coming out the top) and then hang the print in there for about 30 seconds and then take out to dry, the finish is as per glossy marv above, I have not seen any loss in detail as yet, though I accept sharp straight edges may become slightly rounded depending on the level of exposure

This was the video I found dead good http://prometheusrising.net/2013/04/01/prhi-acetone-treatment-for-abs-3d-printer-parts-video/

the idea of acetone and any naked flames is danger danger, I did read about a couple of guys burning their garage down trying it this way…

I hear your concern, and that’s why I said : Turn off the gas - this is an important step !!

In fact, your electric hotplate could be just as dangerous as a naked gas flame.

Acetone vapor is heavier than air, so any vapor that gets out your container is going to sink / drop.

Many electrical appliances have some sort of thermostat controlled mechanical switch that regulates the temperature, and even a small spark internally could ignite the vapor.

When I first started experimenting with acetone vapor, I was using a deep ceramic pot slow cooker which took about 20 minutes to warm up, and even then I was very careful to turn off and unplug the mains before adding the acetone. The ceramic pot held the heat for a long time and that was enough to vaporize the acetone.

My use of a tin pot on a gas stove is the exact same thing, except the pot is heated in about 60 seconds, instead of 20 minutes. In both cases, the power / flame / ignition source is removed before adding the acetone.

I admit that the tin pot does cool faster than the ceramic pot, but I am usually not treating more than 1 or 2 pieces at a time, and the speed of using the gas cooker is a big benefit to an impatient person like me.

Some great safety advice there, I fully agree. I personally always do this outside too as an extra precaution.

If the Marvin’s “privates” has still bad printing, it is good to check if it prints the first layer between legs into air. I noticed that Simplify3D does this. So I added a support between his legs.

have you tried the fix up hack software & play with the settings