See video here
Have you tried this? We have some pro ones at work. I think I will try.
From hackaday:
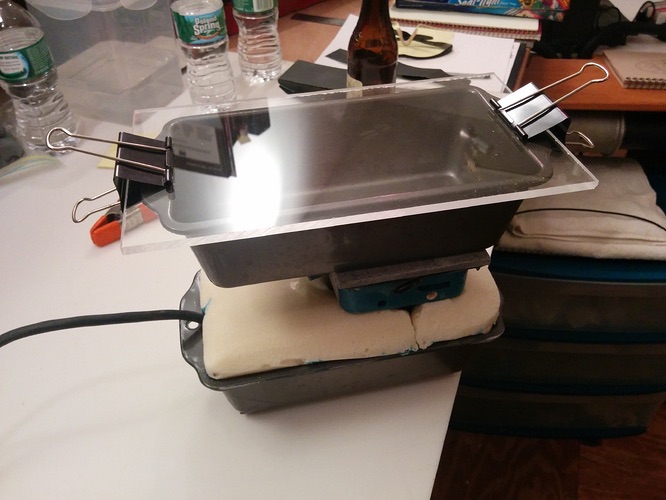
If you’ve had the chance to add a Form 1+ 3D printer to your basement, you might find the post-print cleaning step a bit tedious. (A 20-minute alcohol bath? Outrageous!) Fortunately, for the impatient, [ChristopherBarr] has developed the perfect solution: a post-print agitator that cuts the time in-and-out-of the bath from 20 minutes to about two.
[ChristopherBarr’s] build is the right conglomerate of parts we’d expect when keeping the price down for this hack. He’s combined a palm sander, a couple pints of urethane expanding foam, and two loaf pans into one agitating mechanism that he’s dubbed “the Loafinator.” With the urethane expanding foam, [ChristopherBarr] achieved a near-perfect fit of the sander inside the loaf pan, now that the foam has filled in the remaining contours to hold the sander in place. Best of all, the sander hasn’t been sacrificed for this build; instead, the foam holder was assembled in three stages and isolated from the sander with a layer of plastic wrap to enable later extraction.
[ChristopherBarr’s] simple, yet practical, hack serves as an excellent solution to a number of hobbyists looking to “get things agitated.” While his device is able to polish off the uncured resin from his resin prints much faster than the conventional approach, we’d imagine that a similar build could greatly expedite the PCB etching process in a muriatic-acid or ferric-chloride based PCB etching procedure–far more quickly than our previous automated solution. The time-saving comes at a price; however. Once you’ve installed your very own Loafinator alongside your printer, expect a few nosy neighbors to start asking for visits to check out your new motorboat.
5 Likes
Hahaha! Love it!!
Think I might do the same for a vibro-cleaner/tumbler thingy with a brioche pan!
Watch this space for the Briochenator!! 
Cheers!
AndyL
2 Likes
The video should show the part before and after it gets processed to show how well it works.
I manually shake the alcohol container that came with the Form1+ for about 30 seconds with the part inside, run hot water over the part for 10 seconds then shake the part in the clean alcohol solution for 30 seconds then run hot water over it again for 10 seconds and get good results. About 2 minutes start to finish.
No parts have broken from doing this and its very fast. Sometimes I will soak the part in the clean alcohol for longer if I’m not in a hurry. During the hot water step I rinse the part over a large bowl so the sticky residue that washes off doesn’t stick to my sink. On the second rinse I just swish the part in the water that was in the bowl from the first rinse.
I’m pretty sure a low velocity agitation would work very well with much less noise than a sander. Just an eccentric motion does the trick. I’ve tried it manually with good results but haven’t automated it yet. Shaking the entire container in my hands works a little bit faster than the eccentric motion.
I tried using a couple of pumps to spray alcohol onto the parts while still on the build platform (upside down) but I couldn’t find a pump with enough flow rate and pressure at a reasonable price. It would probably require 4 gpm and at least 10-20 psi to get a good spray. Shaking the alcohol container turned out to be easy and fast enough I didn’t go any further with the automated version.

