Hey guys(and gals), I was hoping someone might be able to tell me where I can find/get a heat source for a hot bed. Some friends and I are designing our own printer, build volume ~406mm x 889mmx 584mm(16"x35"x23"), and are struggling with this last part, “How to heat the bed.”
We’re trying to keep our options opened so our bed isn’t constructed yet(frame and everything else is). We were hoping to figure out how to heat the bed, then “design” it.
The first thought that occurred to me was, we could use a 12"x12" hotbed and mount that in an aluminum sleeve welded to the bottom of our print bed… But I suspect that between the power consumption and time to heat the entire surface, it would be impractical.
So, how about it gang? Any thoughts?
Also, I should not, we are trying to keep this cost effective, so far everything minus the hotbed, we are at just under $300, with a budget <$400.
check out this link. I’ve purchased large heatbed from them on ebay, but you can call them (phone# is in the posting. They are in Arizona.). They do custom PCB and high power heat beds.
http://www.ebay.com/itm/12-X-12-Heatbed-PCB-Heated-Bed-for-3D-Printing-/251349600412?hash=item3a859a889c:g:uF4AAOxyXHpSSaLj
Have a look at silicon heaters. You might be able to find one that, if doubled up, would cover most of that. If you can’t find one (look around aliexpress.com), then you could talk to a company about getting a custom one made. Link: Silicone Rubber Heaters | Custom Silicone Heating Elements
You could use multiple Kapton heaters, which you can stick onto an aluminium plate (for heat dispersion). I’d suggest to use 24V instead of 12V, otherwise you’ll have to switch really large currents (>40A or so). I believe there’s also 110/230V heaters.
Also, I’d advice to make the build volume enclosed. First of all because you’ll need less power for the heated bed. Second, with a printer that large you’ll propably get lots of warping, a heated chamber will prevent that.
Why you want heated bed, it’s like 90s
ABS juice works with all plast, not only ABS - if you budget limited use this method
(i’m using abs juice on a tape)
Google + how to make abs juice = happy printing 
Can I recommend if you are going to make a heat bed that you do it in zones. You can then heat the area that you are printing on. i.e. small print zone 1, medium print zone 2 large print zone 3. alternatively you could have integrated zones so that they better distributed heat. good luck with your monster printer, it sounds like it will be awesome. any pictures?
300*200mm x 3 = 900mm*600mm
3 pieces - lot,Total Price:US $28.88 with shipping
or just buy another format…in really no point to have Heat-Bed use ABS juice instead
Please forget the PCB type ones they are slow and need a strong DC powesupply.
As suggested already, go with silicone heaters here is a 400 x 500 witch works from AC POWER!!! so no need for a big power supply and even a thermistor is installed in it. :
http://www.aliexpress.com/item/Silicone-Rubber-3D-Printer-Heater-110v-800w-400-500-1-5mm-3M-adhesive-100k-thermistor-1000mm/32608941505.html?spm=2114.30010308.8.34.0CXksy
How the hell you can connect it to your electronics? With a Solid state relay (SSR) DC to AC type (DC part connected to you electronics witch simply switching on and of the bed at connected to the relays AC part.)
http://www.aliexpress.com/item/wholesale-1pc-solid-state-relay-SSR-25DA-25A-actually-3-32V-DC-TO-24-380V-AC/32353501839.html?spm=2114.30010308.3.1.Y8lZh7&ws_ab_test=searchweb201556_0,searchweb201602_2_10017_301_407_406,searchweb201603_4&btsid=63a39363-e1ed-4905-b077-51564e8cd7ad
I would also advise to section the bed for a 400x500 and a 400x300 area (based on the silicone heater I linked, but its up to you how to slice it up).
The only problem will be the ALU plate in a such a size(you need this plate to stick the silicone heaters to its bottom) you have to use at least 6MM thick one as the middle part maybe be lifting due to the heat.
I would also suggest to drill small holes pattern into to table, like the Zortrax’s table, this way the heat will not bend the alu plate that much, and with printing a raft witch put/push the plastic into to holes it will stick to the bed really well during the print time. (if you have a printer already just look for a faulty microwave, its door will usually have a similar mesh in it, just cut the mesh out, put it into your printbed, level the Z axis and test it)
I’d be concerned about even heat distribution, if you place a sleeve/plate on top of an off-the-shelf hotplate that’s smaller than your total print area. I had issues with this in the past. Perhaps consider four smaller ones that all evenly heat their respective quadrants properly with a thin plate on top (haven’t tried this, myself). Glass could work, since it’s level and easy to cut into the exact print surface area dimensions. Not sure if you’re planning to commercialize this, so my suggestions may not work out in that regard… Anyway, just some quick thoughts for you.
That was why I decided to abandon the sleeve idea and outsource ideas… Many brains are better than one after all…
And I’m considering commercialization, but I’m going to wait till I get everything working to make a decision. Still have a lot of hurdles ahead, like how to design an enclosure. The design makes it inexpensive but presents some challenges for designing a practical enclosure. I have a few ideas… But that will have to wait until I get the whole thing up and running, and have all the kinks worked out.
rgkeen
11
Make the bed from aluminum, 3/`16" to 1/4" thick, and clamp a couple of 50W heating cartridges to the bottom side. Search for “heating cartridge” or “heat cartridge”. There are online metal suppliers that will supply precut stuff, and 12x12 is a standard size. A little file work and some drilling and tapping and you’re there. The thick aluminum bed spreads heat very evenly, and the high power for driving it to temperature gets it to temp fast and makes insulating the bed much less critical than with smaller, lower-power beds. A local 3d-er uses these on his Delta machine and the bed heats as fast as the nozzle. It’s likely that you will want to power the heat cartridges from AC mains voltage, so expect to use something like an AC solid state relay and an optoisolator to turn them on and off. You can also use aluminum power resistors, the kind that bolt to a chassis in an aluminum shell. These come in power ratings of up to 50-100W, and are only modestly expensive, in the under-$10 range. Here’s a link to a 50W/300 ohm power resistor like I’m suggesting. They’re $3.40 (today) at Mouser electronics http://www.mouser.com/ProductDetail/ARCOL-Ohmite/HS50-300R-F/?qs=sGAEpiMZZMtbXrIkmrvidNw3CpujCJIJgQZa8XHE6gXtNIiOlEnjmg%3D%3D You will incur power supply problems if you try to run a high power heater from a low-voltage DC supply. The current gets out of hand. 100W of heat from a 12V supply takes 100/12 = 8.3A of current. It’s half that, 4.2A, from 24V, and half again (2.1A) from a 48V supply. You will likely have to mess with converting the output of your XYZ controller from whatever it is now (probably a MOSFET switch) to run an external switch if you want to tinker with higher voltages. You can also use more resistors to add more power, as much as you like.
Not sure if you’re still looking, but if you or anyone are, there’s a great seller on eBay I found, 3dheatbed. They ship fast and have a quality product with different sizes & configurations. Check them out.
trimethius recommended zones to which aerated said, “Perhaps consider four smaller ones that all evenly heat their respective quadrants properly with a thin plate on top (haven’t tried this, myself). Glass could work…”
I did an experiment to see how even the heating would be with just two smaller rectangular heaters under glass. I started by first checking their resistances to make sure they are the same. These two pictured are ~114 ohms or 57 ohms depending on how you wire them. At 114 ohms they are different by 1 ohm. Not too shabby.
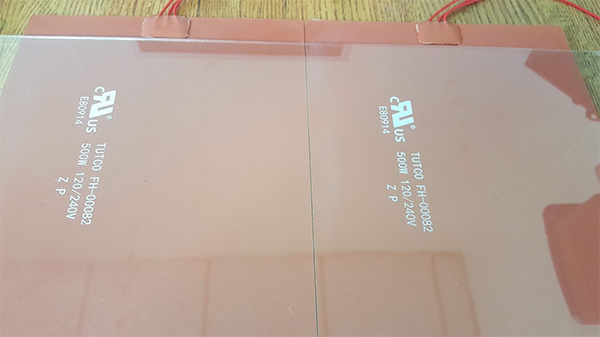
The silicone rubber heaters used in these experiments are stamped ‘Tutco’ but they actually come from a different but related heater manufacturer, Farnam.
Using a variac I fired them up with 60V. The temperatures on both sides are comparable. Regions across a single heater are a little different at first and those differences appear to be mirrored in the neighboring heater too. It doesn’t take log for the heat to even out across the surface. One notable difference is a ~6degF drop at the seam. These particular heaters seem to have a respectable distance from the heating element to the edge of the silicone rubber. I inquired with the manufacturer and I’m waiting on a reply to find out how close the heating element can be manufactured to the edge of the heater.
It would be informative to do this again using a thermal imager with a color screen.
I also wonder if different sized round heaters with a center cut-out would work. They could be concentric with one fitting inside of another. Starting from the middle, more or fewer heaters could be fired depending upon the working area.
I heard back from the silicone heater manufacturer concerning how close the resistive element can be from the edge of the silicone rubber heater. Typically they design the traces to set back from the edge .125”. Occasionally for 120V heaters, they have reduced the set back from the edge to .094” to enable a longer circuit length. That would result in a much smaller distance between outer-edge traces at the seam of two heaters. With a glass bed I imagine the temperature would be fairly even. If I can get ahold of two heaters with a small edge set back I’ll do a test.

