kooliom
1
Hi there,
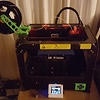
My CTC Replicator (copy of the flashforge) motherboard is broken down and as I can’t find a Mightyboard at an affordable price, I am planning to use my spare MKS V1.4 with Marlin RC7 Bugfix firmware.
So far I haven’t managed to get the default steps per millimiter of the other board as is completely bricked, I wonder if anybody could tell me the default settings of the CTC?
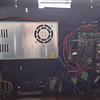
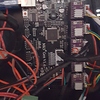
I have already converted to thermistors and replaced all endstops with the mechanical version and also replaced the cartridges to 12v although unsure if I need a 24v or 12v Heated Bed as the MKS takes both PSUs, although I had put a 24v I think that the MKS reduces the output to 12v. Maybe someone can help me and let me know if this is correct.
Once I’d managed to get all settings I will be happy to share the Marlin Firmware and list of materials/pictures in this thread for the conversion to MKS / Ramps 1.4.
UPDATE!!!
I have prepared the Marlin RC7 Bugfix but unfortunately I can’t test it as I need some new thermistors…I forgot to buy them and won’t be able to get any until next week :'0(
If anybody wants to test or contribute in improving the settings in the firmware/Cura please feel free to do so.
Download it and contribute link: Dropbox - CTC Marlin RC7 Bugfix - Simplify your life
Update 2
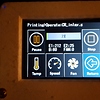
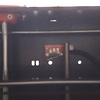
The MKS does support the 24v bed and 24v heat cartridge, so I only had to rewire the bed to the MKS and replace the thermocouples for thermistors. The firmware seems to operate correctly, however I have tried to print and is off centre I believe is my settings on Cura. I have also implemented a MKS 2.8" Touch Screen and is looking sweet. I have to fine tune everything and will reupload the new firmware, in the meanwhile could someone help with getting the print into the centre of the bed, maybe someone with better knowledge could make a Cura profile (bearing in mind is Marlin not Makerbot firmware).
UPDATE 3!!!
Still have got problems, it seems to print on the top right without printing entirely on the bed. The good news is I have research and for the initial position can be specified in Slic3r rather than in Cura, so I am going to experiment Slic3r settings and the CTC Marlin firmware for the next few days.
If anybody wants to help please feel free as this conversion it seems to be a good upgrade once I implement Auto Level and sort all the touch screen controls (as the all the bed leveling commands needs to be changed in the MKS 2.8" Touch Screen V1.2 firmware).
1 Like
I think the extruder steps per mm are 96 but not sure, can have look later on knight if that helps
kooliom
3
yes please… if you have all the default settings xyz steps, retraction,feedrate etc would be a great help as I have finished installing all the parts…
Yeah I have played with my retraction settings but I can get the original settings, everything else is stock, also not too long ago I saw a mighty board on a website. I will see if I can find it and send you the link just in case switching the board fails.
kooliom
5
If you can get the original settings it would be great, please. I don’t think that I would want to switch back to thermocouples though.
kooliom
6
If you can get the original settings it would be great, please. I don’t think that I would want to switch back to thermocouples though.
Yeah I will get them tonight when I get home. And fair enough, let me know how you get on converting everything, atleast you have a wider variety of software you can use.
kooliom
8
Nice one, thank you. I am going to put Marlin and Octopi with my Raspberry Pi Zero so I can add it to my network and control it from my gaming room ;0)
No worries, you’all have to walk me through setting up octo pi for my printer, I heard you can use the gpx plugin to control a makerbot/makerbot clone.
kooliom
10
No problem, setting Octopi is as easier as download the zip file from https://octopi.octoprint.org/latest . Before install it on an sd card, edit the config inside the Zip file wtih your ssid and password for your wifi, you’ll have to coment out // from the option that is more appropiate (probably WPA). Now copy all the contents from the Zip file to the SD Card (with the edited config file) and fire it up with a monitor / tv, touch screen on the pi and keybard will ask you to put a password and login, thedefault is user: raspberry password: pi, then input sudo raspi-config so you can change user name and password, expand the file system and make it boot automatically with your user name and password. Now is configured reboot, connect the usb port to the 3d printer (now you don’t need a monitor or keyboard for the Raspberry Pi) you can access octopi from your web browser on http://192.168.1.167
if you have a compatible webcam or Raspberry Pi cam you will also be able to stream under control tab in Octoprint after enable time lapse. Oilaaaaa!!! Job done…
I think I covered it all, is fairly easy to do.
OH wow tha ks! I will be looking into is over the weekend
The firmware doesn’t know about steps per mm. The slicer (makerware or GPX for anything else) converts coordinate dimensions into step counts and that’s whats in an X3G file.
From the GPX source code though, we can see that the standard Replicator 1 Dual (which is the profile we use for CTC) is 94.117647 steps/mm.
Extruders are 1600 max feedrate, 96.275201870333662468889989185642 steps/mm, 3200 microsteps per revolution.
(all this info is taken from std_machines.h in the GPX source; the structure definitions are in machine.h)
If it may help you, i’m attaching screen shots of all the EEPROM settings from ReplicatorG.
Thank you, that confirms what I’d thought as I found the same settings under the .json files in makerware, although I thought that maybe the ctc steps are different to the makerbot but if uses the same settings I should be able to code Marlin RC7 bugfix. Once is coded and test it I will upload it into this thread so it is a bit easier if anybody wants to convert to ramps or MKS
do you happen to have the cura profile settings for octo print?
kooliom
16
You do can go into settings-plugin and there is Cura plugin although I have not yet used it with the CTC as the firmware is not finished yet, sorry
kooliom
17
If you look at my last update I had a problem with printing in the centre of the bed but I belive is on the cura settings. I am going to have another play with the CTC Firmware & Cura in the next few days, just been busy.
If you manage to sort it before me, please do let me know where I’ve been going wrong??!!
kooliom
18
Also the reason that is homing to centre of the bed is because the safe_homing option was enabled as I was thinking to put a probe for auto bed level. I’ve changed some settings in the firmware so maybe works better for you now, I’ve re-uploaded the firmware… give it a try
kooliom
19
I have already changed some of those settings and reuploaded it after sent my response to your comment. Would you mind sharing your S3D Profile as it will save me time having to make one. I should be able to put all my findings by the weekend when I have a bit of spare time.
There is some changes that you need to make to your code as Z_SAFE_HOMING is only defined when a probe is on use and the reason that bed centre is not quite right is because I input the code wrongly, all these chaanges should help you to get it right as I hava just uploaded the code to mine and seems to work (although I will test it throughly later on this week):
// @section homing
// The center of the bed is at (X=0, Y=0)
#define BED_CENTER_AT_ (151.98, 72.50)
#define MANUAL_X_HOME_POS -151.98
#define MANUAL_Y_HOME_POS -72.50
#define MANUAL_Z_HOME_POS 0 // Distance between the nozzle to printbed after homing
//#define Z_SAFE_HOMING