Some of you may have read my earlier blog about 3D printing for the Royal Institution Christmas Lectures in London (https://www.3dhubs.com/talk/thread/3d-printing-royal-institution-christmas-lectures). That was an opportunity which came about right in the middle of a quite ambitious piece of 3D printing that was to consume most of my December.

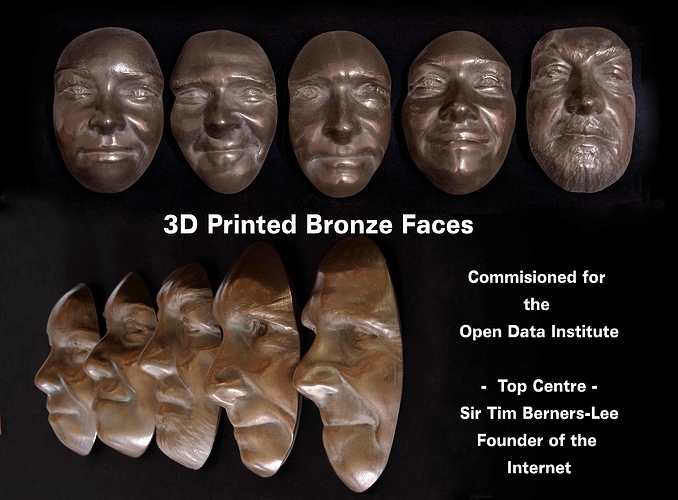
In November I was asked by Fuel 3D and Ultimaker to print out five facial scans taken at an event in London, one of which happened to be Sir Tim Berners-Lee the founder of the internet (which was an honour in itself). These were each about 12cm tall, printed in Colorfabb bronzeFill and then polished. They all came out really well (see below) and led to what follows.

Around this time Fuel 3D found out that they’d won a very prestigious Innovation award from CES 2015, and suggested an idea to me of doing something much more ambitious to show on their stand in Las Vegas.

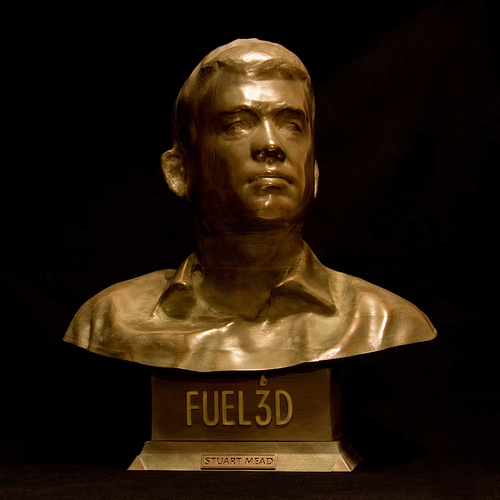
Those who know me will testify that my philosophy is that while I believe 3D printing is a great technology it’s one for which we need to keep finding new applications, and one where we need to keep pushing at the boundaries. The proposal by Fuel 3D was to print out a life-size bronze bust and stand with Stuart Mead their CEO as the subject, and as such it met both criteria.

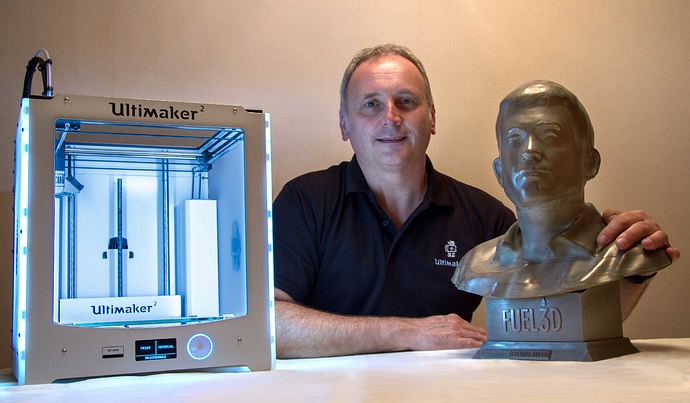
The technique used was similar to that for the Royal Institution print - a facial scan taken by Andrew Smith with the new Fuel 3D Scanify, and a more general head and shoulders scan taken with a Structure Sensor scanner to keep the overall file size down. The scans were then meshed together, and a stand added, by Stephen Atkinson at Fuel 3D before the file came to me for printing in early December.

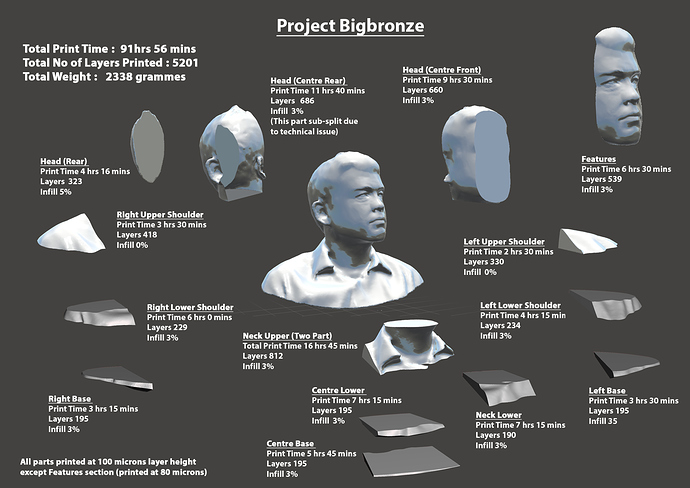
Due to the size of the final printed model it required a lot of splitting for printing on my Ultimaker 2. The head and shoulders were ultimately printed in 16 separate sections and took almost 92 hours of print time in total. Everything was printed at 100 microns layer height except the front facial part, which was printed at 80 microns for slightly better definition.

The stand was also printed in bronzeFill, but only as a 0.8mm thick shell which was then reinforced by two solid wood blocks inside to bear the weight of the 2.3kg print sitting on top of it. This still probably consumed around another 14 hours of printing time though.

The stand was finally enhanced with the Fuel 3D logo, a Stuart Mead nameplate, and an inscription on the back, all of which were 3D printed in bronzeFill and then polished. These were all made off JPEGs (which is one of the really cool features of Cura, the ward-winning open source slicing software developed by Ultimaker).

In addition to the printing there were hours of file preparation to split the model for slicing and printing in the most efficient way, not to mention the time spent assembling the parts and dressing the joints. The final model split is shown here.

The final polish was achieved using a combination of a stainless steel pan scourer, very fine grade wet and dry abrasive paper, and finally a liquid metal polish (in this case Brasso).

In total there was almost 2.7 kgs of bronzeFill used in this model, so my 10% ColorFabb discount through 3D Hubs really did come in very handy!

The project seemed to be never-ending, especially in the days between Christmas Day and the New Year, but when I “dry-assembled” the whole print on New Year’s Eve and stood back from it I realised that I had created something special.

It’s not perfect, most of the joints are very well matched but not invisible close-up, and some are better than others (I tried to push any errors to the back side of the model) and there’s also a spot repair in one place that‘s quite visible. But like anything you do for the first time you learn a lot from the experience and build on that for future projects. For instance, I learned in this project that a soldering iron is a perfect implement to spot-repair (with care) any small errors in a bronzeFill print.

I hope some of you may get a chance to see it at CES 2015 International on the Fuel 3D Stand #71617, if so let me know what you think.

My final summary of this project…"A full-size bronze bust produced without a foundry in sight, maybe that’s why 3D Printing really could be the next Industrial Revolution!!”

Thanks for reading…… Steve from the Birmingham Hub

12 Likes

Wow Steve @HiQuality_Hub

I loved this project! Would love to have a bust of Sir Tim Berners Lee in my house

Would you be available to explain all the process again to one of our meetup? I think our communities going to love it!

1 Like

Hi Simona,

Thanks for your kind comment.

We all owe Sir Tim Berners -Lee such a lot (this message wouldn’t have been possible for a start), so it was a pleasure to be able to 3D print him. I’m more than happy to share some more about this project either through the website or, where practical, through community meet-ups.

1 Like

Steve (@HiQuality_Hub),

Beautiful work! Congratulations! I love the idea of you doing real time airbrushing with a solidering iron - not for the faint hearted.

A weekend long workshop/meetup would be great way for more community members to learn from your experience if you were up for it?

Nice idea @Simona! Mmm perhaps Mr Darwin on my sideboard.

Nikki,

Great stuff, yes the soldering iron technique is quite something. There were several holes in the forehead (caused by there only being very thin layers in that area) that I fixed by fusing filament into the holes with the soldering iron. Once I’d done that I rubbed it down and now you can’t see any evidence that they were ever there.

Many museums are recognising that scanning their artefacts is actually a sensible way of sharing them, here’s one I saw today (http://lincoln3dscans.co.uk/). So maybe very soon we can have a 3D printed bust of a loved one, and one of our icons on our bookshelves.

As I said to Simona, a workshop/community meet-up is a great idea, and I’m definitely up for that (travel permitting).

Steve

Hi Steve (@HiQuality_Hub),

Congratulations for the great work. I am curious about the kind of glue you use with the ColorFabb BronzeFill filament.

Cheers

Hi,

This is the glue that I used. It’s a gel-type adhesive and gives a good thin bond line. It’s re-positionable for 3 minutes, which was very important to ensure I achieved the best alignment between the parts, and was fully cured after 2 hours so the model could be handled. The full bond strength is achieved after 24 hours.

For this print and my Royal Institution print it really did make the overall model feel very strong and not at all fragile.

Not sure where you are based, and whether it’s available outside the UK, but it costs just under £6 for a 33g tube which actually went quite a long way.

Hope this helps

Steve

Amazing!

Now I’m curious. How did the splitting work exactly, is that manual work? I would be interested because it allows for making large prints in general.

Thanks again for all this Steve!

It’s fairly easy.

I used Autodesk Meshmixer (which is one of their great free downloads). In this programme you can import an .STL file and then use the “Plane Cut” command in the “Edit” menu to cut the model into sections. You can flick between which side of the model you want to keep, and by saving, then stepping back and selecting the other side of the plane and saving again you end up with two exactly matched sections. For complex, large models like this one this is the best way I’ve found so far.

Meshmixer is also great for digitally “re-touching” a model to eliminate difficult to print areas (like overhangs) where it’s not critical to the overall finished piece. For the facial prints it’s definitely the 3D equivalent to Photoshop (you could take out wrinkles for instance).

For simple cuts (where maybe the model is simply too tall for the build plate) you can section models inside Cura by going to the Advanced tab and using the “Cut Off Object Bottom” command. This sinks the model into the buildplate by an amount you determine, and you can print the top section of the model. Then re-set the model and print the bottom section using the “Pause At Height” plug-in to stop the printer at the layer that would be the one that would be just underneath the top section that was printed.

Again, you get two perfectly matched pieces which can be joined together. I’ve also used this on smaller models where I’d rather print in sections, with no support material and have a virtually invisible joint, rather than wasting loads of material on support material (and the time and mess in removing it). I’ve just used this technique on the Minecraft Raspberry Pi case that’s my first Hub order - it was a really difficult print because it’s full of overhangs, so I split it in to three pieces.

Hope this helps - maybe I should write up a proper tutorial…

Steve

1 Like

Big Respect Steve, big fan of Tim Berners-Lee can never truly fathom that someone pretty much invented the Internet and the impact it has had on us all. In line with what Simona said I would love to organise at some point a talk from you with the community about this, i think they would find it really engaging.

Thanks

George

Again Great work Steve.

It was amazing to show the Big Bronze Project at CES last week. The feedback was amazing with most people not initially understanding it was 3D printed and then not thinking it was printed on the Ultimaker 2 (that included the founder of Ultimaker who visited the stand)! It was great to watch people walking past and stopping to touch the bust just to check what it was made from and then reading your explanation cards regarding what you did to make the model. We had loads of questions from visitors to the booth about Big Bronze many of them people who worked in metal and were impressed with the end result due to the quality of the finish. Really looking forward to bringing Big Bronze to the BETT (Education Technology) show in London next wee so you get to see peoples responses to what is possible with great collaboration.

See you next week.

Andy.