Greetings fellow TAZ 6 peeps. I’m trying to find out valid information on how to calibrate the dual extruder set up for the TAZ 6. I have spoken to Lulzbot Support and they have acknowledged they do not have any documentation explaining how to do this. The closestCan anyone please assist me? We have experience calibrating other dual extruders on other 3D printers, although not with the Lulzbot TAZ 6. Thank you in advance! Here’s a link to anything close to helping, although it has its limitations. https://ohai.lulzbot.com/project/dual\_extruder\_calibration/calibration/
2 Likes
The Taz 6 incorporates the Lulzbot Mini’s auto bed level detection and compensates for the unleveled bed by tilting the model to match the bed. Does changing the tool head to the dual extruders eliminate the auto leveling sequence when you begin a print? Does it touch both nozzles onto the washer used for leveling?
have you tried that link?, the autocal procedure I think should use the rear nozzle. the screw in the front adjusts height of front nozzle
7 Likes
@tdk Yes I understand how the TAZ 6 levels the bed. I have not tried to print anything because I would like to calibrate the dual extruder first. Are you implying the bed leveling system may compensate for the dual extruder offset?
You could try to calibrate the dual extruder v2 via the following workflow:
You’ll need to choose TAZ 6 (Dual Extruder) in place of the TAZ 5 when you get to Step 3. This should add the the TAZ 6 autolevel scripts to the beginning of the resulting gcode.
@keeble81 Yes keebs- man that link is what I have been going on, however when it comes time to do a test print using the recommended file ( Dual_Extruder_E-steps_Calibration.gcode.) we have trouble finding the file to print. I have solved the problem getting the needed stl file in question. More than likely I won’t be able to address the dual extruder calibration until Thursday when someone will be coming to help me with the ‘physical’ aspect of what needs to be done. Thank you very much for your help. If anyone has any other information please share with me!
@KC_107 Awesome KC! I will attempt that Workflow despite being a mammoth long process. At least you have give me another option. I sincerely appreciate your help dude! I will post my success or failure
-Christian
I think the procedure your are looking for is here
You will need to update the firmware to get the auto leveling working correctly. Just updating the tool head in Cura isn’t enough, when you run the home command it needs to offset the head so that the nozzle hits the button switch.
You can find the correct firmware here:
Also calibrating the e-steps and offsets yourself isn’t absolutely necessary. The tool head should have factory calibrated e-steps on the back, so you can just update those values in the LCD screen or using gcode commands. There is also an option to update esteps in the Cura machine settings, but that only helps if you use Cura to run your prints. I don’t so I prefer to update the esteps in the firmware instead. But again you should be able to use the factory values rather than marking and extruding 100mm of filament.
Likewise, there is a nominal offset of X & Y, which I believe is 0 & 50 respectively. It’s more critical that you get the 2 nozzles absolutely level to the bed and to each other.
Good luck!
@freeformxyz Thanks for your recommendations! It seems as though others are telling me different. I’m not sure which one to follow. I have updated the Firmware. Although I’m not sure if it’s the same Firmware file you are referring to. (?) I’m a bit confused. I will still continue to use Cura for slicing for TAZ 6.
I will attempt trying one of the suggested procedures and will return with my results. Thanks for everyones help!
No problem. Just to clarify, yes you would still slice in Cura. But you can also run your printer from Cura after you slice, or you can use any of several other options to run your gcode (I use Repetier-Server). So all I was saying is if you only update the esteps in Cura machine settings, then you’ll have to run your printer through Cura. Whereas if you update the esteps directly in the printer firmware (either via the LCD screen or by issuing gcode commands) then you can use whatever host you want to run your prints after you do your slicing in Cura.
For the firmware, there is a specific firmware package for a TAZ6 Dual Extruder at the second link in my post above. You’ll want to ensure that is the firmware you have loaded. Once loaded it will say TAZ6 Dual on the LCD when you power on the printer.
The other links folks provided are useful but only cover calibration of the tool head. This assumes you’ve already installed it and just want to dial it in. The link I provided covers the full install, including mechanical, firmware, and calibration. So you should refer to all of them.
Hope that helps.
@freeformxyz I have made through the process to the following stage where I hit another road block. I’m hoping you can continue to assist me further. I have made it through to step 24
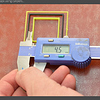
*see attached photo:
Measure the four gaps
24A
Use your digital calipers or ruler to measure the gap between each model from the top & bottom, and the gap between each side.
24B
Record your current values.
The printer isn’t making the black 3rd black square and the actual squares it does print are horrible quality wise. Is there any way you could interject with your wisdom? I’m so close to the end I just want to see this through to the end. I hope you are still following this thread.
Please respond with any suggestions. They will be truly appreciated.
Can you upload a picture of what you’re getting? I’m not sure what you mean by 3rd black square. There should only be 2 squares. If you setup your g-code correctly, the inner square should be nozzle 1 and the outer square printed by nozzle 2. There should also be a skirt which is printed by nozzle 1. It’s also important that you load the inner square into Cura first, this is what sets it as the first nozzle.
I took a look and I realized that Lulzbot’s default ‘ABS & ABS’ profile defaults to Ooze Shield selected. This might be what’s messing up your calibration. Try turning that off and running the print again. Or you can download the g-code I generated here:
Of course, double-check that your nozzles are level and temperatures are correct. Also make sure you entered the factory e-steps correctly and that they are in fact stored in memory. I’ve noticed sometimes you have to save them in the LCD menu a few times to make sure they stick. If these are off it can have a big impact on your prints.
On a side note, I also noticed that Lulzbot sets the support default to Grid (for soluble support). So you’ll want to change that to Lines before making any real parts. And also change the ‘Support dual extrusion’ from ‘First extruder’ to ‘Both’. This will speed up your prints by allowing either nozzle to print supports rather than forcing it to one nozzle.
Hope that helps
Cheers
@freeformxyz Is there any way we can PM? I have some information I would like to explain and prefer it not be open to the general public if you catch my drift? Please let me know.
Thanks a trillion for your help! Don’t know how to reciprocate!
I don’t think there’s a way to PM on 3DHubs (or at least I’m not aware of it). Feel free to contact us via email at info@freeform.xyz and we can take it from there.