Hi Bill,
Is there a particular reason that you want to go back to the original FW? I’ve seen that website you mentioned before as well (back when I thought I had bricked my printer), but it seems to be easy to always get it back to either the MakerBot FW or SailFish 7.1, both of which seem better than the original.
So in short, no, I don’t know of an easy way to go back to original. But I wouldn’t recommend it anyway - SF 7.1 seems to be the best for it so far. Although I still want to get to the higher versions… 
Adam
Dresch
22
I would certainly like the option of loading the original firmware. QiDi Tech has emailed that they do not support SF for this printer, so if I ever have to return the controller board, this might become an issue.
My complaints are minor. The front panel is a bit twitchy with SF 7.1, something I did not notice with the original software. Sometimes it responds OK, other times I need the press the buttons a number of times for a response. I also would like to use any available SD card I have. I have not seen the stunning improvement in print quality that people are showing but again, any number of factors may be at play there. It does, generally, seem to print better.
I have done a lot of programming with atmel and arduino products, including instrumentation development, and I find it really weird to be able to load only one version of this software. Is QiDi using a slightly larger bootloader, or some weird setting of flags in the Atmega1280 that is preventing loading later versions? I mean a 1280 is a 1280 and the amount of of Flash, EPROM and RAM should always be the same.
Again, I would like the option of going back (this is not a dig at SF at all) to whatever level of Creator was on the original equipment and if anyone can show me that, I would appreciate it. Thanks, Bill
Dresch
23
Thinking about it, maybe the fuse bits are the problem. If QiDi did not set the fuse bits to the standard configuration used by the other manufacturers, then perhaps there are protected memory areas that are kept from being written to by the later versions of the software. The standard Atmega Arduino bootloader is 1K:
If QiDi set the fuse bits to something other than 1K bytes for bootloader and SailFish 7.x (x > 1) needs some of that Flash memory, then the newer SF versions will not load and checksum correctly…
What we need is the fuse bit settings for the QiDi and then the fuse bits settings for the CTC. A simple ISP change to the fuse bits is all that maybe needed to upgrade to SailFish 7.x (x >= 2). Let me do a little poking around.
That’s a very good theory. Let us know how you make out. I am very eager to get past 7.1 (as I keep mentioning). And let me know if you need me to do any testing once you get things sorted out.
Dresch
25
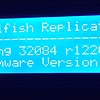
It worked! I have an old STK500 Atmel programmer and I hooked it up to the ISP-1280 port of the QiDi MightyBoard.
The fuses read: 0xFF, 0xD8, 0xF5. I reprogrammed them to be: 0xFF, 0xDA, 0xF4. I ran ReplicatorG, did the normal selections you specified but tried SF 7.6 and it programmed fine. I have not tested beyond that, but I will explain the fuse choices in another post. Trust me they make more sense than what QiDi had left in there.
Bill
Amazing! That news just made my night. Although I was kinda hoping it would be a fix through the USB port. So your programmer is similar to the one mentioned in that website? I may have an old AVR programmer from years ago - any chance that might work? You’ll have to explain the reprogramming part in more detail…
Dresch
27
Here is a quick write up on how I reprogrammed the fuse bits on the Atmega1280 of the QiDi controller board. I will post more info as time permits. SF 7.6 seems to be working OK. I can use my 4Gb SD card again. I did do some printing and things worked as expected. Works very much like the FlashForge Creator Pro, including the same PITA things.
Setting Up the QiDi Tech 1 for SailFish 7.pdf (1.42 MB)
VERY much appreciated! Now off to find a compatible programmer…
Dresch
29
Here is a cheap programmer and 6 pin adapters (pick one) that should work for reprogramming the QiDi:
http://www.amazon.com/Downloader-USBASP-USBISP-Programmer-ATMEGA8/dp/B00AX4WQ00/ref=sr_1_fkmr0_3?ie=UTF8&qid=1451883355&sr=8-3-fkmr0&keywords=avrisp+mkii
http://www.amazon.com/s/ref=nb_sb_noss?url=search-alias%3Daps&field-keywords=B00CW80MP6
http://www.amazon.com/Adapter-Board-AVRISP-USBASP-STK500/dp/B00FHHYJ7G/ref=pd_sim_422_2?ie=UTF8&dpID=41pifd2wrGL&dpSrc=sims&preST=_AC_UL160_SR160%2C160_&refRID=10KC1276EAH4J8RX94YW
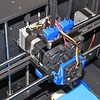
I bumped up to SF 7.7. SF 7.6 was working fine but thought I would test this out next. I was able to get an external PLA cooling fan working OK also (commands M126/M127) with SailFish. (24V/44mm Fan + Thingiverse
Active Cooling Fan Duct v2 for Replicator 1 / Duplicator 4 / FlashForge / CTC by thruit00 - Thingiverse). Just soldered the leads to the “Extra” connector on the controller board. Turns on and off under software control. Have a different fan on the way, blower style, to see if the PLA cooling works out better.
Let me know if anyone else was able to do the SF upgrade with the ISP fuse changes.
I am going to be posting an Instructable to try and get larger exposure to this hack (umm, correction) to the QiDi controller.
(Thanks again Adam…)
Bill
Hi Bill,
I ordered a programmer very similar to the one you linked (except it is a native 6-wire one). Just waiting for it to arrive from China and then I will be programming right away! And I’ll be sure to post my results.
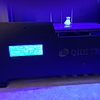
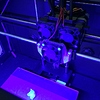
For mods, I also have an active cooling fan (same one as yours), a new filament tube holder above the extruder steppers, dual filament duster/oilers, heatsinks on extruder stepper motors, filament guide on rear of machine, glass bed with corner clips, bed adjustment thumbwheels, rounded bridge top for the upper enclosure, and reversed the power toggle switch (to make it easier to reach from the left side of the printer).
Out of interest, have you tried a dual extrusion with it? It took me a while to get the toolhead offsets to something I’m happy with (-1.19 X and 0.096 Y), but it seems like it could still be a tiny bit better. Looking for someone to share their experience with this and let me know if I’m on track with it.
Adam
rcleav
31
Bill thank you for your investigative work on the Qidi Tech.
I received one of the programmers from Amazon today. I’m going to try the instructions on changing ISP Fuse settings tonight.
Then upgrade Sailfish.
Do I have to do the sailfish upgrade a version at a time or can I just go to the latest one?
Your recommendation should I stay with 7.6 or go all the way to 7.7?
Dresch
32
I haven’t seen any problems with 7.7 so far and that is what is used on the Flashforge Creator Pro we have at work. Of course I don’t know what the advantage is of 7.7 over 7.6 either…
Good luck with the fuse setting. Let us know how things go!
Bill
Shamez
33
Adam please let me know how it goes. I am going to order the programmer as well. Thank you Bill and Adam
Dresch
34
Awesome looking set up. I did print the filament guide also, a truly wonderful thing. I have done a few dual prints but just some dual color figurines and the like. I see that #3DBenchy has a dual color torture test, which I think I will try. I will let you know if I get any results from that. Benchy is a minor obsession.
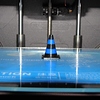
The cone looks pretty dead on, maybe just a tiny bit of shifting on the top two layers (or that could just be the photo). I have taken to clamping my glass bed (made some little stainless steel clips from old windshield wiper blades) because occasionally it would slip and produce funky print results. I would love to dampen the frame a little bit to reduce the hard jerking of the print head.
Bill
Dresch
35
Sorry did not answer your original question: I believe you can just program whatever SF level you want. I don’t think SF needs to be incremented up. I jumped from 7.1 (via Adam’s instructions) to 7.6 directly after resetting the fuses.
Bill
Dresch
36
Thanks for bringing the dual print up!.
My first couple of tries under SF7.7 were a disaster with the print cartridge trying to drive itself out the left side of the printer. Turns out my extruder X offset had defaulted to 399mm!!!
WARNING! IF YOU UPGRADE TO SF 7.7 DO THE NEXT TWO STEPS…
I found this page:
http://www.sailfishfirmware.com/doc/troubleshooting-common-issues.html
I set both X and Y offsets to ZERO (0.0mm) at the front panel using the submenu:
http://www.sailfishfirmware.com/doc/ui-utilities-menu.html#x17-470003.7.11
Dual prints are no longer trying to take the printer apart. The prints are pretty close but about a mm off between layers it looks like.
Looks like I need to do this next to tune it in:
http://www.sailfishfirmware.com/doc/tuning-dual-extruder-calibration.html
Bill
rcleav
37
My report on a successful upgrade to Sailfish 7.6.
Or why can’t I just leave things alone instead of putting myself into these situations.
I tried using AVRstudio version 4-7 but was unable figure out how to get it to recognize the usbasp programmer http://www.amazon.com/gp/product/B00AX4WQ00?psc=1&redirect=true&ref_=oh_aui_detailpage_o03_s02 with http://www.amazon.com/gp/product/B00CW80MP6?psc=1&redirect=true&ref_=oh_aui_detailpage_o00_s00 10 to 6 pin adapter.
What I succeeded in doing was totally erasing the programming from the board. (@&$#)
Remember Google is your friend in times like this and I found a thread in the Google group MakerBot Operators. https://groups.google.com/forum/#!topic/makerbot/tBTVx85-hpg
Titled Loading firmware on a new Mightyboard Rev E.
What they do is link you to the hex files and give instructions needed to reload a blank Mightyboard just like mine was.
Using a program called AVRDude google it and a couple command prompts I was able to reload the hex files giving the board back USB functionality and then the bootloader which had the added benefit of setting the correct fuse bits. I’m not going to go in to detail on how to do It. It’s all in the MakerBot Operators thread.
I had to copy and make the hex files usable then modify and run their command lines to fit my programmer and environment.
The command line I used to load the bootloader hex file.
avrdude -p m1280 -F -P usb -c usbasp -U flash:w:bootloader/atmega1280.hex \ -U lfuse:w:0xFF:m -U hfuse:w:0xDA:m -U efuse:w:0xF4:m -U lock:w:0x0F:m
I do not recommend this procedure unless you’re your desperate and have a so called bricked board.
If you do decide to use this method I will not responsible for the results but you should read the MakerBot Operators thread closely.
Ron
Dresch
38
Yikes! And congratulations on getting thru it Ron. Awesome recovery! Glad you are back up and running.
I will see if I can find anything about using AVR studio with these 3rd party vendor ISP programmers. The AVR studio way is obviously easier (and less heart stopping). I had just assumed, incorrectly it seems, that the 3rd party vendors would emulate an ISP programmer Atmel already makes.
(Perhaps just the command line for reprogramming the fuses with AVRDude…)
See my comment below on resetting the extruder offset in SF before doing any dual extruder prints. You will want to do that sooner than later…
Bill
Dresch
39
Ron,
It appears that there is some software out there for this programmer that will allow fuse bit programming.
If you could check this out and see if it works, it may be of help to others trying this (and may prevent the memory erasure and not having to go thru avrdude):
http://extremeelectronics.co.in/software/extreme-burner-avr-1-3-beta-test/
If you watch this video, at 32 seconds they show a fuse bit programming page:
https://www.youtube.com/watch?v=a-V-jv4jSQw
Appears that you could go in and simply alter the fuse bits.
Bill
rcleav
40
Bill,
I tried the eXtreme Burner AVR program with my usbasp programmer on an old CTC I picked up from Craigslist. Didn’t want to risk the Qidi Tech but it has the same board. The eXtreme burner does not have a ATmega 1280 chip option so you do get an error while reading the fuse bits. The fuse bits I read off the CTC was Low FF, High DA, Ext. FD, Lock CC and Calibration FFFFFFB6. Didn’t try to change anything but it looks like it might work. eXtreme Burner does have a ATmega2560 chip option.
Hope this helps
Ron