XYZed
1
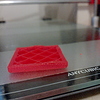
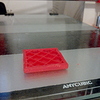
Hello guys.This is a printed part from my recently built prusa.i have build several prusas but this is the only one with auto bed leveling and the only one that causes me trouble.i do not know if it is clear in the picture but my calibration cube has some high spots on 3 of the 4 walls except the one on the back.i changed the nozzle and it got better but not 100%.as far as i know auto bed leveling does not make so small corrections so it may not be due to the auto bed leveling.
1 Like
I am leaning towards two factors:
1. Over extrusion building up, eventually leading to the hump.
2. Warping. If this is abs, you have to mess with keeping your build area warm, mess with temperatures, until you get a good print. If this is PLA, add active cooling, such as a fan.
That being said, can we please get more information as to what you are doing, your settings, your material, etc.
2 Likes
XYZed
3
I am stupid.i used wrong steps per unit for the z axis and the filament was squized.i am using the 8mm threaded rod for the first time and used the wrong steps.Thank you for your help.
hi, nice to meet you
grace from the 3d printer factory
for the diy 3d printer,leveling at the first time during printing is a little difficult, but if you adjust it to the good status, it is much easier to use later.
for the hotbed leveling,i can recommend you the www.alunar.net (under the pritner M508)
on the website, can show you detail video for hotbed leveling
maybe not same as your printer
but can be reference, similar for all the diy prusa models
if any questions about the 3d printer welcome to contact me , i will be glad to help
as we have strong technical support team in our 3d printer factory.
Best regards
grace
skype:eros1025
Its not your bed levelling on a part that small. It looks like you are depositing more material at that point in your print. It is common for printers to pause slightly when changing layers and it would either leave a blob or excess material in that area. Some slicers randomly disperse these layer changes so the excess material does not stay in one spot. Simplify3D and other slicers have that option. You an also set a “coast” setting to turn off the extruder at a set point from the layer change (it simply stops extruding so excess material is not build up). There is also a setting called “extra restart distance”. I usually set that to a -.20 mm or so and it would basically do a slight retraction at those locations. The best way for you to determine if the cause is at the start of the layer or the end of the layer is to slow the speed down and watch carefully as it prints. You will then see which phase of the print the printer is depositing excess plastic.