I bought me a Duplicator i3 Plus. Brought it home, leveled (poorly) then printed the unicorn. It came out beautifully. Then I read the rest of the manual, watched videos, read some of your posts and in other forums. Printed the vase, downloaded and sliced/printed stuff off of Thingiverse, modeled (all by myself!) a torus with writing on the outside, sliced and printed it fine. Look at me! I’m a happy 3D printer owner!
Then something happened. I don’t know what. The extruder and the bed are alternately ganging up on me - mostly the extruder. It doesn’t extrude straight and things don’t stick. I thought I may have printed something too closely (it left an gouge of outline on the bed). So I thought I must have damaged the nozzle. I replaced the scored bed (first with the extra bed cover, then with 1/8" glass). I think that eliminated the bed problem - esp after fixing a slight tilt in the Z-rails.
Nothing I do is working. All those successful prints when I didn’t know what I was doing - now I think I know more and I can’t even print that M3 thumbwheel. I’m ready to throw the thing out the window (not that that will damage it - I’m in the basement and the ground is 6" below my window). I have faith. You will see what I’m doing wrong and tell me and life will be good again.
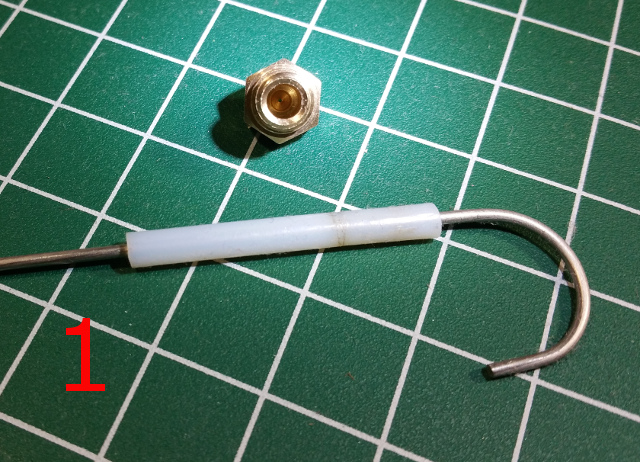
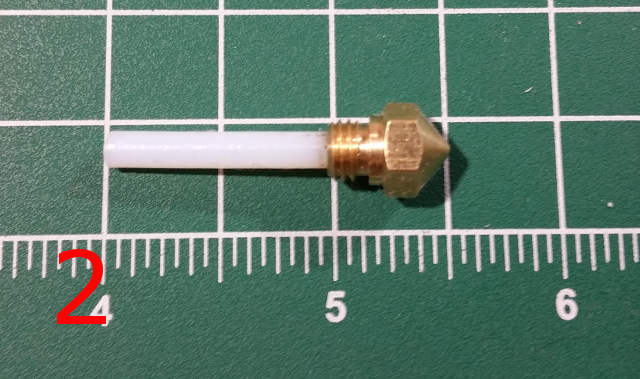
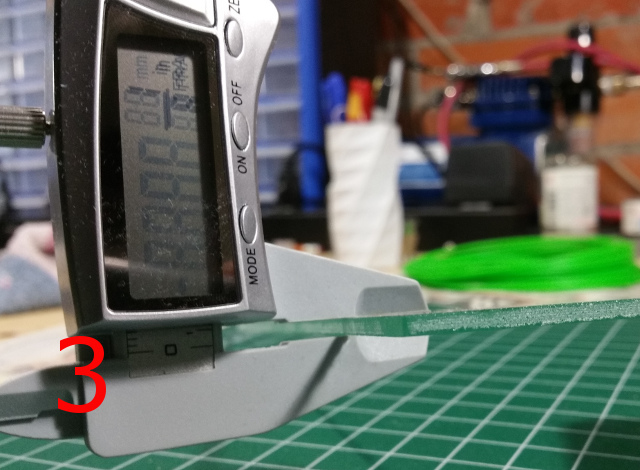
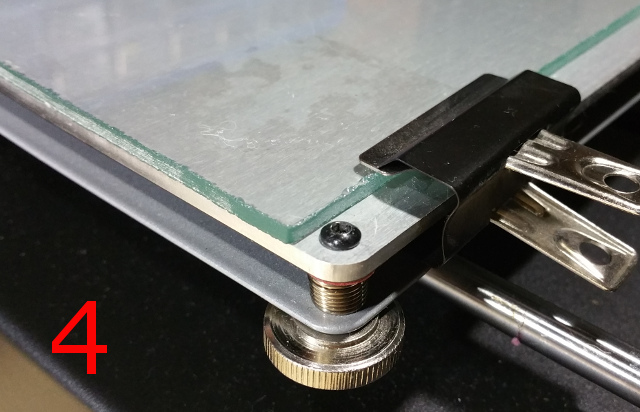
I bought some new nozzles and tried the following (each number corresponds to a picture):
- Brand spanking new nozzle. The old plastic throat thing, but clear of obstructions.
- Insert the plastic throat thing into the nozzle all the way.
- Cut a sheet of 1/8" thick glass to fit. Just plain old glass that used to be in my buddy’s window before the baseball incident. Cleaned it with rubbing alcohol until it squeaked.
- Put in on the nicely cleaned aluminum bed with clips (I had previously tried thermal silicone, but it didn’t keep the glass immobile). I adjusted the clips after this pic to ensure they didn’t get in the way of the print head during levelling.
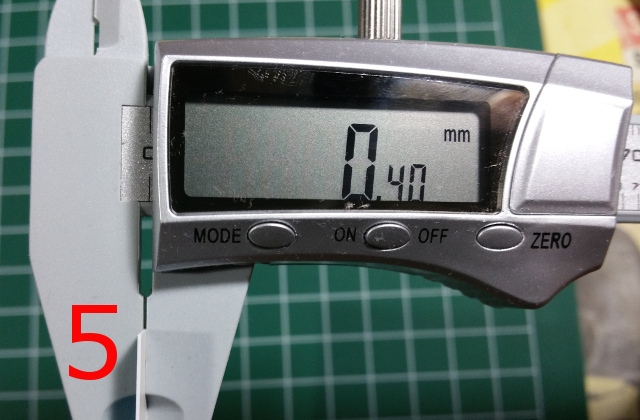
- Preheated to ABS temps, then using a 0.40 mm thick business card, I leveled the bed with the built-in auto-leveller. Then I leveled it again. Did this until I went through the auto-level steps without making an adjustment. The way I did it is to place the card where the nozzle will go before the nozzle moved. Then I moved the card back and forth, narrowing the gap until the nozzle stopped the card. Then widened the gap until I could just feel the nozzle against the card as I moved it back and forth. Repeat for each of the five stops the nozzle makes.
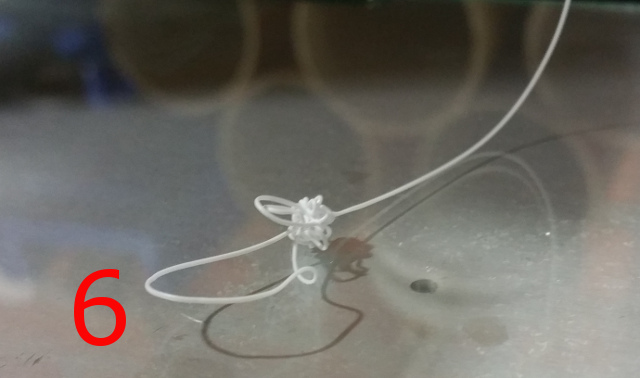
- Then I loaded the filament using the “Load filament” button. The filament came out in loops at first, then eventually started coming out straight. I didn’t catch it with the camera in time. You seen in this picture the loops that used to be bunched up directly under the nozzle - now at the end of a long filament. When this happens it’s as if the filament defies gravity. “I’m going down? Nope, lemme just turn around and go back up.”
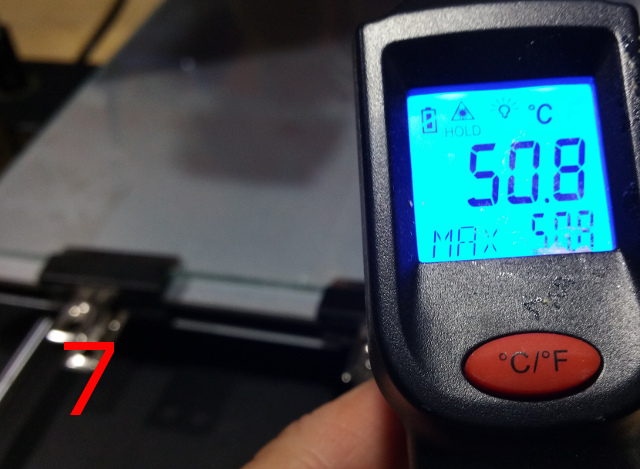
- Before trying a print, I checked the bed temperature. I’ve heard the glass makes it not warm up as much. With the LCD telling me the bed temp is 54°C, my thermometer tells me the glass is just under 51°. I’ve checked at different temperatures and the bed is consistently 3-4° cooler than the LCD thinks it is. I think this is okay.
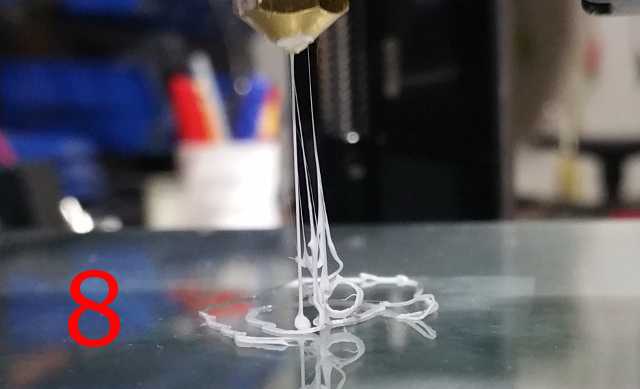
- Started a print, and blammo - happened again. The filament loops a bit, giving something to catch on until very quickly I get something like this picture.
If a picture is worth a thousand words, how much is a video? Well, I’ve got three:
- After laying down a few passes in the brim, it immediately bungles up when trying to print the actual thing.
Extruder problems vid1 - YouTube
- By the time I hit it, the ooze has climbed back up and attached to the nozzle. I didn’t notice before I hit [+] E to extrude a bit. Kinda pretty, but definitely not helping print what I want.
- YouTube
- Another attempted print. You’ll see me clear away a bit of ooze before the print starts. In the brief time after that and before the print starts, you can see a tiny loop form - dooming the print.
Extruder problems vid3 - YouTube
What am I doing wrong? I’ve tried thinner and thicker cards to level with smaller and larger gaps. I’ve checked the Z-axis rails. I didn’t do any of this for my first several prints - they were easy and hassle free. Now, nothing I do results in a successful print.
Help!
horsj
2
In my experience, most filaments will not stick to a clean glass plate, I use 3DLac on mine, but there are other things you can use, such as PVA and some types of hairspray. Regarding clearance, 0.1mm works best for me. For PLA I set the bed temperature to 50C and for ABS I use 100C…
When I’ve encounters issues like this it has been down to the temperature gradient between extruder and bed, and or the extruder temp not been high enough for the material been used (I’ve found this can vary by brand) try hoping the extruder temp by 10-15C and the bed temp by 5-10C.
Have you tried reducing first layer print speed? I don’t have a i3 Plus, just a v2 and v2.1, but when I troubleshoot, I like to turn down print speed much lower just so I can watch what’s happening easier. If you’re printing directly to glass without something like hairspray or glue, it can sometimes be hard for material to stick when printing quickly.
I can’t tell from the video, but I assume the fan is off for the first layer, otherwise that would cause issue as well. As far as the filament curling out the nozzle, that’s normal for all my printers, just one side will naturally cool faster and give it a curved look.
Anyways, try going as far down as 10% print speed just to see what happens and even raising the extrusion temperature a bit to see if it grips the glass better. Just my two cents.
1 Like
Simple - use an adhesive on the build plate (in theory clean glass should work but I’ve never had a lot of success). Pritt Stick or even better 3D Lac . ABS has a tendancy to warp especially if in an unenclosed build space (like yours). Try PLA or even better PETG (so called ABS substitute without all the grief of ABS). Pardon the puin but stick with it - your doing nothing wrong.
use blue tape, kapton tape, hair spray, glue stick, 3DLac,
PET tape, PEI sheet (my favorite, very durable nothing else required for adhesion), check your levels you seems to be leveled ok but just redo it. Get a feeler gauge like https://www.google.com/aclk?sa=l&ai=DChcSEwjN4fDU6YXUAhWZSg0KHYf3COMYABABGgJxYg&sig=AOD64\_28oMhdf3w5jisRfMpwz5SkQ2ayag&ctype=5&q=&ved=0ahUKEwidq-7U6YXUAhUDKCYKHYWMBywQwzwIBA&adurl= if you need a little help. other wise clear your nozzle out, maybe an oiler to help with clogging (I wouldn’t use it now a days, I do however use a dust collector for my filament). turn your heat up on your print bed to 70c. My i3 is usually form 60-70c with PEI sheet for adhesion. Everything else looks fine to me… oo and I would slow down the first layer to about half of your other layers.
Haven’t stated anything others haven’t already just do the research
First thing to do, if you messed it up, reset the firmware settings to Factory Default. then calibrate and setup the printer step by step as written in the manual. do not try to set steps of extruder or steps of x y and z axis. stay at the default settings. (you can do it later, if you experience accuracy problems more then 1%)
Howdy, first… Don’t let it get you, it is a machine and you are only human. No problem, you can do this! First, get some blue painters tape and try that… Cheapest way to test and easy to replace. (or you mess around with generic auqanet hair spray but I avoid sprays) As for leveling, I use a regular sheet of paper but I also print a skirt of 5 rows about 5 mm from my prints and give a manual adjustment because I have a removable bed and I have to adjust it every time I remove it. Also, make sure the leveling is done with bed warmed up if you print with a warm bed because glass will change shape. (also you are assuming it is flat, and it’s from an old window, so may not actually be flat!) Also, The curling part at the start is just static attraction and the filament when it starts, very normal, you just gotta get it off before you print. What software are you using? My S3D (no, not a requrement…) starts a print over the edge of the bed and extruded a chunk of filament that eventually pulls the curled part that happens at the start, off my nozzel and off the bed. That is in the startup script, and can be found if you need… I just don’t have it now on my phone. Hope this helps some… Don’t give up!
Every comment is correct accept for one thing. While yes you must have something on the bed for adhesion with ABS and the manufacture says the printer will print ABS. You should not for safety sake use ABS on this brand of printer without first upgrading the inside controller board with an Mosfet board. I have burned up two Di3’s (one nearly caught fire). The onboard Mosfet is not designed to maintain temps above 190c for extended periods of time. Even 190c is pushing the envelope. Look in the hub there are easy to follow instructions for doing the upgrade and it requires no solder. It you are smelling any odd odors coming from your control box stop while using your printer turn it off immediately and call whom you bought it from to ask for an exchange. This may mean you have already caused serious damage to your controller board.
BTW some of your issues with the nozzle may have been a clog from when you had misleveled it and it scraped up material into the nozzle end.
Enjoy!
Maybe try some calibration test with the flowrate and temperature.
If that’s ABS then I believe your heatbed should be hotter (also as a note, ABS doesn’t usually print well with open air printers).
Make sure your extruder is set to the temp is should for the ABS filament you’re using. Some vary in recommended temperature.
I honestly think the default print surface is way better than glass or tape or pretty much anything apart from maybe PEI.
Try printing with a brim instead of a skirt and perhaps try printing a bit slower till you start getting solid prints again.
Also idk what slicer you’re using or the profile you’re using for that slicer, but I recommend Cura 2.5 or Simplify3D, try searching the internet for profiles people have already had success with. I recently got a Cocoon create Touch which is a Wanhao Dublicator i3 Plus rebrand and I have been comfortably using the default Cocoon create Touch default profile. They keep updating their website links since it’s new but this link should have profiles for ABS and PLA: http://support.winplus.com.au/hc/en-us/articles/115002537203-CURA-Profiles-for-the-Cocoon-Create-Touch-HE161192
Going back one tab will take you to more information like filament temps, manuals, gcode sames etc…
Hope this info helps 
You bed temps are way to low for abs.
Hotbed: 90 - 95 C for abs
Nozzle: ~245 C
Print adhesion requires you to play around with some simple stuff. First make sure it’s a good surface for adhesion. There are a million ideas on what that means. I still use the stick on surface that came with mine. Second experiment with temps. Hot bed temp and nozzle temp adjustments make a huge difference for surface adhesion play around ±10C layer.
Haven’t seen you switch out filaments? Have you tried a different brand?
I think you should start with PLA and get a hang of the settings. i.e leveling, quality, etc then move to ABS.
ABS needs hi-temp + optional ABS glue/slurry to get the first layer stick to the bed, PLA doesn’t 60 bed temp would be enough.
Try HATCHBOX 1.75 PLA and see if it works out then it’s ABS filament.
For the nozzle yours should be ok as far the video shows but the best ones out there are Micro Swiss Mk10 All Metal Hotend Upgrade Kit
That doesn’t need PTFE tubing at all and also makes it easier to insert filaments. I the stock one was the worst.
Also did you took the buildtak surface on your bed?
I will certainly try reducing the speed and increasing temperature. You’re right, the videos do not show it but the fan is indeed off.
I could try different filaments. But this one I’ve printed a lot with before the mysterious something happened.
Also, although I mentioned I heated to ABS temperature, I am using PLA made by Inland.
I will order the Micro Swiss hotend. I like the fact it’s all metal, and one video I watched said it lets you print at higher temperatures, opening the door to other materials. Looks like it’s worth the upgrade.
I thought I had damaged the original buildtak surface. It was certainly after I gouged it the problems started. I first replaced it with the spare that came with the printer (way easier to remove and clean than I’ve read). When that didn’t solve the problem I switched to glass.
I should have been clearer in my post: I’m using PLA. The picture I took was after pressing the preheat button for PLA - it got up to 54°C and my thermometer read 50.8°. I tried at various temps and found the thermometer read 3-4° lower than what the printer’s LCD tells me. That was the point I was trying to make. The actual gcodes heated higher (I’ll have to look them up)
As for slicer: I’ve used mostly Slic3r. I’ve tried Cura but found it a bit more difficult. Also, many videos I’ve tried to follow used Slic3r, so using it made it easier to follow.
I can’t wait to try calibration tests - I just can’t get past the first layer or two right now. Although I’ve not varied the flowrate - I’ll give that a try.
I thought Wanhao fixed this. I just bought the printer a week ago (although it could be old stock - I should check the serial).
In any event, I’m not using ABS yet. When I do, I will certainly be careful.
Thanks for the encouragement. What’s the best way to get that initial drip off before printing? I use a stiff card and just kinda scrape it off (usually works, sometimes pushes it more against the nozzle). If there’s enough hanging I chance using my fingers. Said “ouch” once or twice, but no real harm done.
I will probably try hairspray first. The skirt definitely looks like it should help (I said “brim” in my OP, but I meant “skirt”). As you see in my first vid, it didn’t work (not to say I will stop doing that! it still is a good idea)
I don’t even know how, yet, to make changes like this. There’s a menu called PID, but I don’t know what it’s for and am not going to mess with it until I do.
