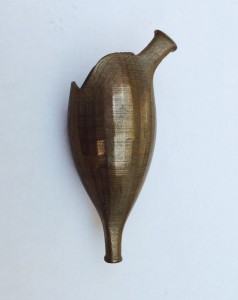
A beautiful small sculpture by designer lara behmoaram.

Preparing for Printing

GREG_M38002015-03-23-23_41_20-Order-799514-_-3D-Hubs-300x224.jpg

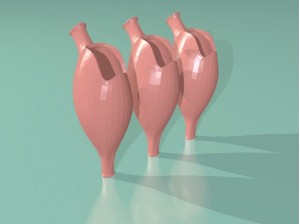
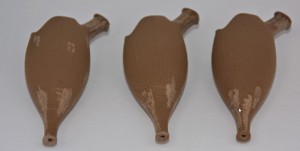
The supplied model is a single file containing 3 identical parts. We will split this up because we’ll run a test print first and we don’t want to triple the risk and potential waste. Meshmixer is the ideal tool for this.

GREG_M38002015-03-24-00_06_59-Autodesk-Meshmixer-capsule.mix_-251x300.jpg

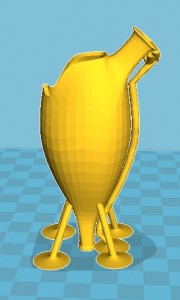
The orientation of the model is fine and it looks perfect for FDM printing, except that there is not a lot of contact area with the build plate. a brim will be added by the slicing software, but that will likely not be enough, so while we’re in Meshmixer, we’ll add some custom support.

GREG_M38002015-03-24-00_29_48-Cura-15.02.1-180x300.jpg

GREG_M38002015-03-24-00_29_58-2015-03-21-by-Eye-Fi-188x300.jpg

And now we have a printable model with a low failure risk using @ColorFabb recommended settings for bronzefill:

  • Layer Height 0.2
  • Fill 100%
  • Speed 50mm/s
  • Bed 60ºC
  • Nozzle 220ºC

Finishing Bronzefill

Removing the supports

The Meshmixer supports remove very easily, and any support artefacts can be gently filed away. After polishing the models any remnant of the supports will be gone.

GREG_M38002015-03-24-00_39_49-2015-03-22-by-Eye-Fi-300x151.jpg

Lara is happy to do her own finishing on this occasion, and being aware of the tessellation in the model, she is not yet sure what her preferred finish will be. To give her a few ideas of what to expect, we print an extra model to test the finishing on.

Steel wool

GREG_M38002015-03-24-00_48_58-2015-03-22-by-Eye-Fi-300x191.jpg

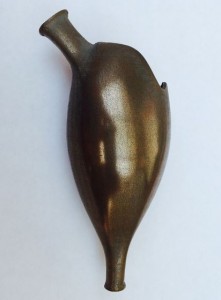
First off- a rub-down with steel wool very quickly removes the Course MDF-like matte finish, and really shows up the tessellations in this case. This result is after a couple of minutes at most.

Spit 'n polish

GREG_M38002015-03-24-00_54_15-2015-03-22-by-Eye-Fi-300x276.jpg

Now a little elbow-grease!
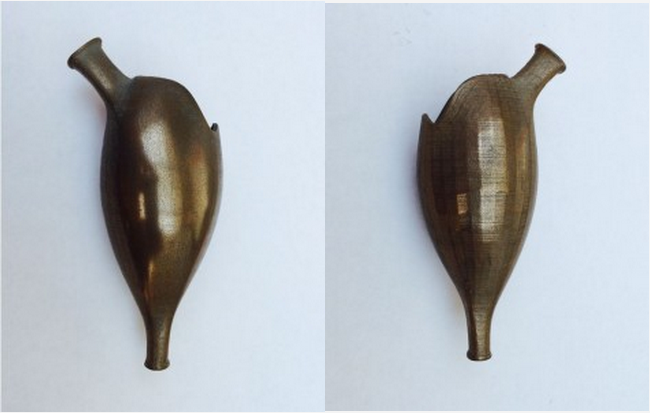
The finish at this point is beautiful, with the tessellations making a wonderful contrast to the flowing shape of the object and they catch the light nicely- the picture here really doesn’t do it justice.

But there is one more step…

Sanding smooth

Using 360 grit Wet & Dry sandpaper with the aid of water to prevent clogging, we polish out the tessellations and any remnant of print lines. this is a lot easier on the gentle curves but naturally takes more effort to get around the sharper curves and crevices. This is worth bearing in mind when designing or perhaps smoothing a scanned model. We could possibly have gone a little courser -240 grit - to reduce the effort required, but ultimately after another round of Brasso, the final finish won the day.

GREG_M38002015-03-23-23_17_58-Z-Axis-3Ds-3D-Printing-Hub--London--Prints-From-£5.00-_-3D-Hubs-e1427161715368-221x300.jpg

See them side by side, which do you prefer?

See the original post here.
GREG_M38002015-03-24-00_56_52-FullSizeRender.jpg-Windows-Photo-Viewer-e1427158709421-238x300.jpg SidebySide.png

3 Likes

Amazing print, nicely detailed and short process to post finish the Bronzefill print. Thanks for sharing

Great… I guess using these filaments would be a good point to start using my second extruder for supports…

nice!!!

nice!!!

very nice

Nice, looks like it turned out well. Did you try any finishing techniques that didn’t quite work out?

Hey @gregh, this looks so great! I’d choose the left one for the smoothness, but I am really curious what did Lara choose and what’s her creative feedback!

So am I @Arnoldas ! Lara missed the delivery and it sounds like she has a lot going on but she said she’d let me know and I’ll feed back here when she does. I was quite blown away about how it looked, so I was blogging before I even dispatched! (with lara’s consent of course)

Hi Alex,

Thanks. The shape of this particular model was so easy to print and to polish, which is down to Lara’s design.

I tried using a buffing wheel with polishing paste, but I don’t think it was necessary, it sort of worked but previous buildup on the buffing wheel deposited on the surface, so I ended up polishing it by hand anyway. It polishes quite easily really.

I can tell you that on a previous model I polished (a scan of my son) there were a lot of hard-to-reach curves and the brasso ended up getting ingrained everywhere. It looked OK because the brasso looked a bit like corrosion, but in the spirit of experimentation I decided to put it in the dishwasher on a hot cycle along with an XT version -I had read that it helps the finish on XT. Well, it didn’t make a big difference to the XT, but it softened the bronzefill so that the model collapsed and I don’t think it did much to help the finish either!

Attached a new print of that model -not yet polished.

Regards,

Greg

Thanks for the write-up @gregh. I’ve had a spool of BronzeFill in my drawer for a couple of months now. just waiting for a customer to ask. :slight_smile:

cheers,

AndyL

Pot8oSh3D