Hi all,
I’m soon to be ordering my first 3D printer (a k8200 kit) but I’ve got a quick question.
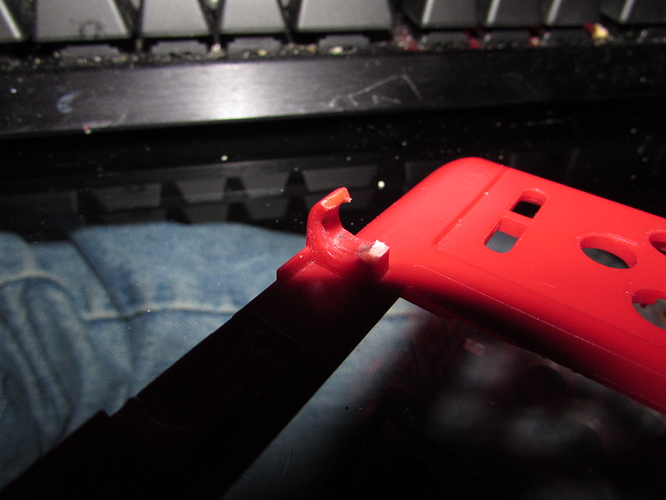
In the picture you can see the ABS casing of an original Nintendo DS hinge for the screens. Now the cases are replaceable, but I thought it would be fun to see if I could print the missing bit of the broken hinge.
As you can see, the hinge has snapped midway, but it still attached to the main body.
I did think of using silicon to mold the broken surfaces, or possibly using a 3d scanner to figure out the uneven surfaces.
Or would it just be best to file/cut/sand the rough edges flat, figure out the circumference of the hole, then make the part to that size?
Essentially, this question is more about how to figure out the dimensions of broken parts, say for example, the original surface couldn’t be modified, and the new part had to be made with uneven edges, to fit into an existing broken/rough surface.
Hopefully that makes sense, and I’m looking forward to hearing any suggestions or advice.
Thanks
Sra1
2
Hi!
To 3d print a solution, the easiest way would be filing it down then printing a new hinge. You could superglue the 3d printed replacement part to the original, depending on the strength/stress capabilities required, or you could also fuse it together - some people have fused 3d printer filament together with a soldering iron, for example, which has led to purpose built tools which operate on the same principle. If you were likely to want to retain this information, you could scan it. Apps for smartphones exist, e.g. 123D Catch, which would let you take a quick scan of the original.
However, the fastest option in my view would be to rebuild the hinge using a Polycaprolactone plastic. This can be found online cheaply under various brand names - e.g. Polymorph, ShapeLock. In your case about 5 grams of the stuff would do the job.
This plastic has a low melt point, about 100 degrees celcius. This makes it a nice option for the home user. The concept is you put the raw pellets in a pan of boiling water, the heat fuses them together, and you end up with a molten plastic you can work with your hands. A drop of red food colouring could be added to the water to help blend with the original red colour. You have a good few minutes to mould a shape, once you’re happy you immerse it in cold water to help it set.
In your case, you could mould the polymorph onto the broken hinge (clean it, but don’t file it, the broken edges increase surface area so leaving them will help with adhesion). Your aim should be to rebuild the hinge minus the hole. Set in cold water. Then drill the hole. Or, if that doesn’t work, re-do it with a nail/bolt/screw/pen/tube/skewer of some sort as a placeholder for the hole.
If you have the polymorph granules/pellets, you could do this in under an hour. This makes a great quick fix, especially for a one-off breakfix, where you don’t need to know the exact dimensions.
However you fix this, please let us know what works!
Garyg
3
Hi
My approach to this would be to draw and print a simple replacement.
Place your print on the area you are wanting to replace.
Temporarily glue down your simple replacement part and look at what appears to be wrong.
Correct the drawing and print the 2nd part.
Usually when I do this type of thing it turns out pretty good after two or three attempts.
I hope this helps you in some manner.
1 Like
Sra1
4
This sounds like a winner - there’s an instructable showing how to fix something using a pencil sketch, concept being import the sketch into a vector graphics programme, then import the vector and turn into a model, then print.