dannem
21
I thought all nozzles where made from brass. I guess i will make a new one as soon as i can measure the other one. I think it will arrive tomorrow but then its work and probably no time to even look at it.
dannem
22
Thanx. His journey from unboxing was really good and quite entertaining.
dannem
23
It have Arrived. Checked so all parts was ok and there. Looks good so far. With three kids at home i have to leave it for later. Thanx to you guys i at least know where to start and i will change some of the parts at once.
Mirth
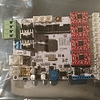
24
As expected that’s a GT2560 board in case you were wondering! There, I saved you about an hour of internet rummaging 
As a rough guide it took me about 4 hours to assemble my first printer but that may be because I was very familiar with the design due to the amount of research I did beforehand… but it shouldn’t take you too long!
One of the first things you may want to print are some self centering Z couplers.
If you go onto my 3Dhubs page or look me up as Acrimonious Mirth on Thingiverse you’ll see both parts I’ve designed for the same printer build as well as collections of mine that include the Z coupler and printed spares and stuff. You may find those useful 
Also the wires going to your X carriage… wrap those in spiral wrap or even electrical tape to keep them tidy and stop them rubbing on the frame as you use the machine. Also get a decent sized fan and search “MOAB GT2560” and your fan size which should get some results for fan mounts that clip onto your motherboard. Keeps things nice and cool!
I hope this isn’t too overwhelming, but we’re always here if you need any help! Having been where you are though, my Thingiverse may help you a lot
dannem
25
I will check them out after the build is done the parts for z axel. I will have 15 minutes here and there with kids home so might take a couple of days. Probably i will post here and give a shout if (when) i get stuck.
dannem
26
Hi again. Its built. Wires everywhere still but eill sort that out after i find what i did wrong… There are a lot of images on gt2560 but whatever i look its the wrong connections. I dont know where rhe steppermotors are supposed to be. Took it by chance and so also with everything else. The z axel is up down or back and forth? And what is the other axels? Guess i sleept on that math lesson… I got a faul also on display. Says error mintemp. Hope you could find the time for this.
RCole
27
Standing in front of the printer, X is right-left, Y is in-out (towards and away from you) and Z is up-down.
I’ll have to leave info about the error to people with more experience with the electronics.
Wiring diagram for this board:
http://www.geeetech.com/wiki/index.php/File:GT2560_wiring.jpg
Manufacturer wiki:
http://www.geeetech.com/wiki/index.php/GT2560
As you have two motors for the Z connect both, doesn’t matter witch Z motor to witch connection.
The Error mintemp is an error message meaning that one of the temperature sensor is not connected to the right place(one for print head and one for the heated bed)
Check the wiring diagram and connect them correctly, polarity doesn’t matter as they are a basically a resistor.
The Coordinate system was answered already.
T.
dannem
29
I checked and checked again. Nothing is wired wrong and the cables seems ok. Anything else i should check? Thanx
dannem
30
If i short the connector it shows max temp. That means that the wire to tha heatbet is broken if i understand correctly?
Nutz3d
31
Hey
If you have a multi-meter it is worth measuring the resistance on both your temperature sensors at the cable end. There should be around 100K ohms depending on the sensor type used but can vary from around 10K to 200K - its not really the actual value you are interested though. If it is open or short circuit something is wrong and you’ll get an error which is designed to avoid heaters being switched on if the sensors fail.
You should also trying swapping both temp sensors around to see if the message changes. This helps ensure the connector positions are correct. Also removing one at a time will tell you which one is causing the error.
Failing all of that, try fitting a 100K resistor to the circuit board connector and see if the message goes away. DO NOT run with this in place though
It’s also worth noting, when I was looking over the circuit wiring link above, don’t connect your hotend cooling fan to the PWM connector. The PWM connector is controlled by your slicing software and gets slowed down or switched off. This results in hotend jams for sure. Reserve it for any filament cooling fan you add later where the PWM control will allow it to be switched off during the initial layers.
Cheers
Dave
Mirth
32
If you shorted it and it says max temp that is normal as wires have almost no resistance and a thermistor decreases in resistance as temperature rises.
if your wire or thermistor is broken it should say “min temp” and refuse to heat.
Also as previously said, X is left to right, Y is back to front and Z is up and down.
The board should have names for the connectors on its back, mine did.
If you’re all set then put some grease on all the bearings, tension it and get started with moving all the axis individually. Then home, test heating and try your first print
dannem
33
Something is still wrong. In the upper left of the display it says its getting hotter when i preheat the nozzle is that right or should that be the heatbed? The other side (right) is still 0. I dont get errors when i move the heatbed therm checker to the wrong place… But i cant heat the board either way.
Mirth
34
Hmm… are you preheating from a preset? From your computer or from the LCD menu try heating bed to 70°C.
In LCD menu that is in the menu, setup/prepare (I don’t remember the name properly, sorry) then preheat ABS or PLA then go to the main menu again and scroll down to control (I think it is, again, my printer isn’t with me right now!) and in it you should see nozzle and bed temp. Change those to nozzle = 0 and bed = 70.
your printer may have a preheat option for the bed only, in which case you can forego the second step.
If your bed doesn’t heat up carefully check the nozzle. If the nozzle is also cool then it may be a wiring issue for the bed.
dannem
35
Im trying now. Heatbed is still cold. Maybe its the wrong connection on the heatbed? The wirediagram say is this one but i will try to set the heatbed on on nozzle two and test since it ony not gives me faultcodes when the bed is connected to the right place. I mean i put the temp wires on the wrong place and than it reads ok. Strange but who knows
dannem
36
Didn’t change a thing. Need to find my multimeter and check all the wires i guess.
Nutz3d
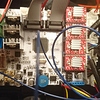
37
Hey
Here is a pic of my connections.
Blue wires is my Hotend Heater
Red/Black is my Heatbed Heater
Left Hand Temp (Red/Red) is my Heatbed sensor
Right Hand Temp (Red/Black) is my Heatbed sesnor
It looks like you have a sensor in the wrong place.
Cheers
Dave
1 Like
Nutz3d
38
Hey
It’s worth noting that the 3 sensor inputs and 3 heater controller outputs are mapped in the software so in theory could be different between different builds/variants.
Best to confirm the sensors are correct resistance, wires ok and start from there. You can also buzz the heater wires for good connection, not sure what resistance they should have - probably pretty low.
Putting a volt meter on the heater output when preheating will also tell you if the heater is being supplied any voltage. This is a PWM output so the value will vary but again your really looking for something or nothing.
Apologies, if I’m telling my granny how to such eggs on the electronics.
Cheers
Dave
dannem
39
Oh so stupid… It works! So simple. It was the temp wires that was wrong. Thanxs!
1 Like
dannem
40
Next issue  Downloaded drivers and repetier 1.6.2 and manually tried everything. The z axel only moves on one side. If i take it out of the motherboard the other one can move. Any ideas? Thx