If it is clogged that’s different from leaking. I’ve gotten debris jammed in the nozzle tip before. Best way to fix was using a strand of wire push the object back up through the hot end while hot.

After some more disassembly, I think I have a better idea whats going on. I had to remove some insulating tube that was shrink wrapped around the head. I don’t know what material it was, but even the maintenance videos on the Solidoodle site don’t show the tape on the print head, so I’m assuming it isn’t needed.

So it seems like the nozzle is not seated well against the threaded tube. I believe the plastic is leaking up the threads and out these holes on the heater block. (see attachment) The nozzle seems tight against the heater block, so the easiest exit is these holes. I don’t know what they are for, but if it wasn’t here, the leak would be where the threaded tube enters the heating block. I’m thinking now, I need to remove the nozzle, and put it back on tighter, possibly with some Teflon tap, Then use some Kapton tape to re-attach the sensor.

I might be able to loosen up everything and tighten it all up without removing the sensor, but that seems risky.

It’s too bad that both of my extruders are having the same problem. It might be a production issue.

Those holes are for the temp sensor right?!

no, the sensor is taped to the side of the nozzle.

I’m surprised that they sell the barrel and nozzle. It kind of implies that it’s OK to do my own repair work on this. So looking at this picture tells me there is no heat break. What did you mean by a cooling issue? Can this be fixed by changing printer settings?

I see that but someone drilled holes in the heater block for a sensor. If plastics is coming from those holes this hot end block is ruined.

It came that way, new from the factory. Like I said, if the plastic is leaking up the threads, this is just the first place it can escape. If the holes were not there, it would leak out the top where the barrel enters the heater block. I may be wrong, but the real problem is the plastic is leaking up the threads, which indicates that the barrel is not seated well in the nozzle.

I want to add, that I am very thankful for the help I am getting here!

After watching the guys videos I see the brass tube through his “holes” and hes TApIng the sensor. Is that the official solidoodle design? If you ask me, I say stop taping everything and do it right.

Do you think this will seat the nozzle against the barrel better? I don.t see any leaking between the nozzle and the heater block, so I am assuming that they are already as tight to each other as they can be.

yes i see now. I wasn’t familiar with this design.

What are the holes for chuck?

Maybe the barrels bevel isn’t meeting with the nozzle’s bevel?

No clue. I"m a noob. This is my first printer, and I was actually very nervous tearing the extruder down to this level.

Have you tried to tighten it up while it is hot?

That’s what I’m thinking. The reason I posted the video, is that is hows how to break it down and build it back up. Maybe some Teflon tape on the threads would help as well. If I break this down further so I can re-seat the nozzle against the bevel, I think I will need to get some Kapton tape to re-attach the sensor.

Not yet. I was thinking the next step would be to heat it up to some high temperature and let all the plastic drip off. What temperature should I go for for the PLA that’s caked on?

I bet it would burn out fine with a small butane torch light. 250c should vaporize it. But your hotend isn’t meant to go that high.

check out www.soliforum.com we are a solidoodle based board

Hi, first off I don’t have the same printer as you, but the nozzles are similar.

The nozzle (tip) is very short, and the throat is the pipe that feeds plastic to the

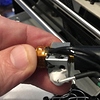
heater. Ok well undo the Nozzle from the Aly Heater Block. Remove the thermister,

sometimes they slide out, sometimes they are held by a screw (in which case it looks like

a wire with a crimp on the end). Remove the heater element. Again, some extruders are loose fitting, others have a tiny Allen Grub Screw nipping them in place. You should then have the nozzle, heater block, and throat as one assembly. If there is insulation around the Heater Block, carefully cut it at one of the corners, and gently peel it off (you will replace it later and tape it back on with Capton Tape). Ok, now grim the heater block in a small adjustable spanner, and use a 6mm spanner to unscrew the nozzle. Then use a pair of pliers to grip the throat, and unscrew the throat from the heater block. You will have three pieces now (nozzle,Heater Block, and Thoat). Look at the nozzle.

Inside some nozzles is a small piece of PTFE tube, the throat is normally fitted with PTFE tube as well. Try to remove the tubing if you can.

To clear a nozzle of PTFE (really easily), mount the nozzle on a nail held in a vice or pliers, and heater the nozzle up until it’s glowing Bright Red. (The PLA Plastic expands, then burns off. By heating it till it’s bright red turns the PLA in to dust). When the plastic has firsted burning off drop the nozzle in to cold water (the PLA dust will drop out). That’s the nozzle clear, and any PTFE debri burnt out. You should be able to see throu it now… OK, the heater block needs any spilt PLA plastic burnt off of it. So treat the Heater Block in a similar manner. Same goes for the throat, but you must remove the PTFE tube inside it. You can pick it out with a pin. Burn the plastic off the throat as you did with the nozzle and heater block. Reline the throat (and nozzle if it had it) with 3mm O.D. PTFE tube with an inside diameter of 2mm. To put it all back together first screw the nozzle in to the heater block, and tighten it. The screw the throat in to the heater block.

Re-assemble the extruder as you took it apart, using CAPTON Tape to repair the insulation.