dara
21
Hey,
no I’ve not experience that yet, but a good point to now consider in my deigns is to try and avoid
potentially sealed up air pockets. Maybe it could be done by modeling in an air flow channel through the infills
leading out to a less noticable area so theres no sealed off areas for pressure build up, but I guess it depends on the application.
I’m thinking maybe I could print a clay raft, the on top, my clay form as normal and once its in a leather green state to take
the clay cutting wire and slice off the bottom raft, leaving the infills bottom exposed and now open to
air, maybe firing it upside down with that exposed could help. Or filling in the forms infills in the first place at the cost of extra clay would be a (expensive) soloution.
All the best.
Gidget
22
I had no problems with the pieces I fired and they had little gaps between the walls. I try to build solid walls now to avoid this problem but again the pieces with little gaps fired nicely anyway. I have had some cracking on some pieces but they happened where the build layers were not tight enough together. Also I have adjusted my models now so I make the bottom the same thickness of the walls or even thinner so the drying in more consistent.
hi you all
thanks for the feedback
i started now to use the more tiny tip with the printer to refine my outcomes. works good in the results.
during the first cleaning i recognized, that the bearing is totally fixed to the screw spring connector. i cannot dismanthle the extruder as stated in the manuals. not my fault.
this leads to leaking in the top of the extruder. between bearing and the plastic part/container.
very disappointing. clay comes out of that front slit frequently in bigger blobs.
did anybody had this problem too?
i allready maild the WASP customer service about it.
for now i try to fix it with some rubber ring, to prevent from leaking.
all best
christian
Hi Christian,
I’m having the same issue with clay extruder kit 1.0. Did you manage to solve the problem?
Thanks
dara
26
Hey Domenico,
I’ve found myself that the small pinch bolts on in the tension coupling can become seized and need a lot of force to unfree them, my second extruder delivery had that issue and I though they’d welded it together or somthing but yesterday it did come loose in the end, try some adding water or oil and a long L shaped alan key.
The issue of the clay pushing out the top opening, I know its a major pain…it can happen for a few different reasons, blockages, extruder holding compacted clay from previous use etc. I usually reduced the air pressure to around 3-3.5 bar depending on how soft my clay mixture was and that stopped the issue for the most part, I usually consider my clay too wet when it happens.
I bought the new extruder design thinking this would stop the issue but the first two times I used it the clay only came out the top, didn’t even reach down to the nozzle, after spending days on it I emailed support to find out I need to update the firmware as it was making the screw turn in the wrong direction…although I think thats only an issue if you change extruders.
Theres are so many variables in the system that I’ve found it very hard to get consistent results but I’ve invested enough time to be confident in its potential once the issues are fully understood and can be monitored. Its not a setup I expect to deliver prefect prints without monitoring in my expierence. Due to the wetness of the clay, air pressure range, nozzle size, slicing software choices, structural design considerations in clay, air bubbles killing a print and long print times it can be a handful and disheartening but stick with it and you can get good results as in their examples.
All the best.
Does anyone have any successful models (preferably with Cura Settings) on thingiverse?
When firing ceramics that have trapped air pockets, bring the temps up very slowly. If you do so the air has a change to dissipate through the unvitrified clay body. If you bring the temps up too quickly the outside shell of the clay body vitrifies and then the air pressure builds until it pops like popcorn!
rrapier
29
Where did you get the firmware, and how do you update it?
I just received the 2.0 version of the clay extruder and i’m having the same problem. The screw turns the wrong way, it seems. just pushes clay up until it squeezes out of the top. Never gets down into the nozzle.
dara
30
If you email WASP support they will explain how to uypdate the firmware to get it rotating the correct direction, but if you also have the V1 extruder like I do it will make that one rotate the wrong direction, the alternative being to swap two of the cables coming into the motors head around…this will make the V2 extruder rotate in the same (correct) direction without having to update the firmware, the support email can also send you a video on how to do this, only takes 5 minutes so I’d suggest that method. All the best.
rrapier
31
Thanks Dara, I never got a response from wasp but I did switch the wires. Prints are amazing! Way more satisfying than printing plastic!
dara
32
Glad you got it going, can be a very frustrating proccess to get the balance right in my experience, due to the nature of the material, but yea, when it works its worth your while.
Gidget
33
Any help you could give me in how to switch the wires (ie. which wires and how to access them) would be helpful. I am having the same issue with my version 2 extruder (motor turns the opposite direction). Glad you are having success, I have been making print with the old exturder for a year and I too love the results.
dara
34
Hey Gidget, I can email you with and some photos if you know how to pm through this site?
You jumped at the new version same as myself. In comparison I spent weeks straight on the V1 and wet “peanut butter” mixture to achieve large detailed prints, still with around 25% failure rate, but I recon thats due to what I’m trying to print, the housing on my V1 has totally cracked apart by now so making another one. V2 is quicker to clean and should not have that issue, but they are only supplying the tips in one size, you can order more and drill them to make larger nozzles, at 20euro a pop. I was deflated when the V2 kept pushing out clay from the top opening with the same mix & file setup, so I’m currently experimenting again to find the happy medium.
Another tricky step is drying large prints without cracking eh, I’ve been using some bell jars or plastic bags so far with ok results, after a dozen or so fails. ALso, maybe find a local window repair busines, get them to cut you 20 copies of your glass build plate on the cheap.
Gidget
35
Thanks I’d love to get the photos of how to re wire the exturder.
Some of the issues you mentioned where things I have bee dealing with too. Now I have a pretty good mix and my ver. 1 extruder has been working great, but I do a lot of maintenance on it and it is a lot of work so I can’t wait to use the ver2 as it seems easier to clean and prepare.
I don’t do the PM on this site but maybe we could email? I will show you what I have been getting from the printer. elibonerz@gmail.com
here is a sample of one of my prints
rrapier
36
Sure. I’m going to try uploading the .PDF with the guide to switching wires as it will help others out, and I’ll send you an email with the document too. I have yet to clean my v2.0 extruder and I’ve used all the 10kg that came with it. I haven’t had it sitting for very long in between prints.
swapping_the_clay_extruder_motor_wires.pdf (6.55 MB)
rrapier
37
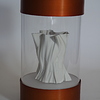
Here is a close up of a Julia vase print. Very pleased!
rrapier
38
I’d also like to ask what people are printing on? I have been trying to find metal or plastic disks that i can remove from the printer without ruining the print. I get the best results printing directly to the print bed because it is so flat and level. But it kills me to wait over a day for the clay to dry out to a less fragile stage. I ordered some plastic pottery bats to see if those will do the trick. I’ve been cutting squares of stainless steel from a spare sheet i have but in the process i slightly bent some so the prints get messed up.
As for the consistency i try to get…its when ive mixed enough denatured alcohol that it starts getting easier to spread, just starting to get a creamy kind of thickness. if i grab a handful im able to squeeze a bunch of it out through the bottom opening of my fist. Also, when printing i know my clay is too wet if the print starts to wabble or be pushed around by the print head, the right wetness should print a fairly stiff object, or at least with the objects ive been printing. If the wall starts to quaver as the print head lays down a layer i usually scrap it and start a new clay mix.
The print Z setting i use for the stainless steel print bed is 433? i think, or something-33. thats the setting for the 2.0 metal extruder tip.
If my printer starts laying down lines that look too squished together i usually back off the air pressure from 4 bar to 3.5 or so, until it starts to leave more of a bead than a totally flat line. Although i do experiment with flatter lines just to see what will happen. on circular vases it seems to not make a huge impact, and i assume the more squished it is the sturdier it will be when fired.
Hi All,
I have a customer who bought a 40/70 with the clay extruder and he is having some real issues with the consistency of the clay and also a few other issues ie: jittery extruding and spaghetti like results , I myself do not have much knowledge on the product and i am hoping someone on here would be able to help him please if possible. He would like some to email or call someone to get some advice. If anyone is able to help please let me know and i will pass on the contact details of the customer. Thank you all
Simon- Sales
Daemon3D Print
Hi Simon!
Where are you based? We now are pretty pro with the machines. It´s best to be on site to check all the bits
1 Like